Tuesday, December 13, 2022

DIY: Handmade Christmas Cards

Under The Plum Blossom Tree, DIY: Handmade Christmas Cards, a blog post about making Christmas cards from colorful card stock papers which have been cut from metal dies, hand stitched and have gold embellishments and gems attached.

Hello friends! Once again I am trying my hand at creating some handmade greeting cards, this time for Christmas.

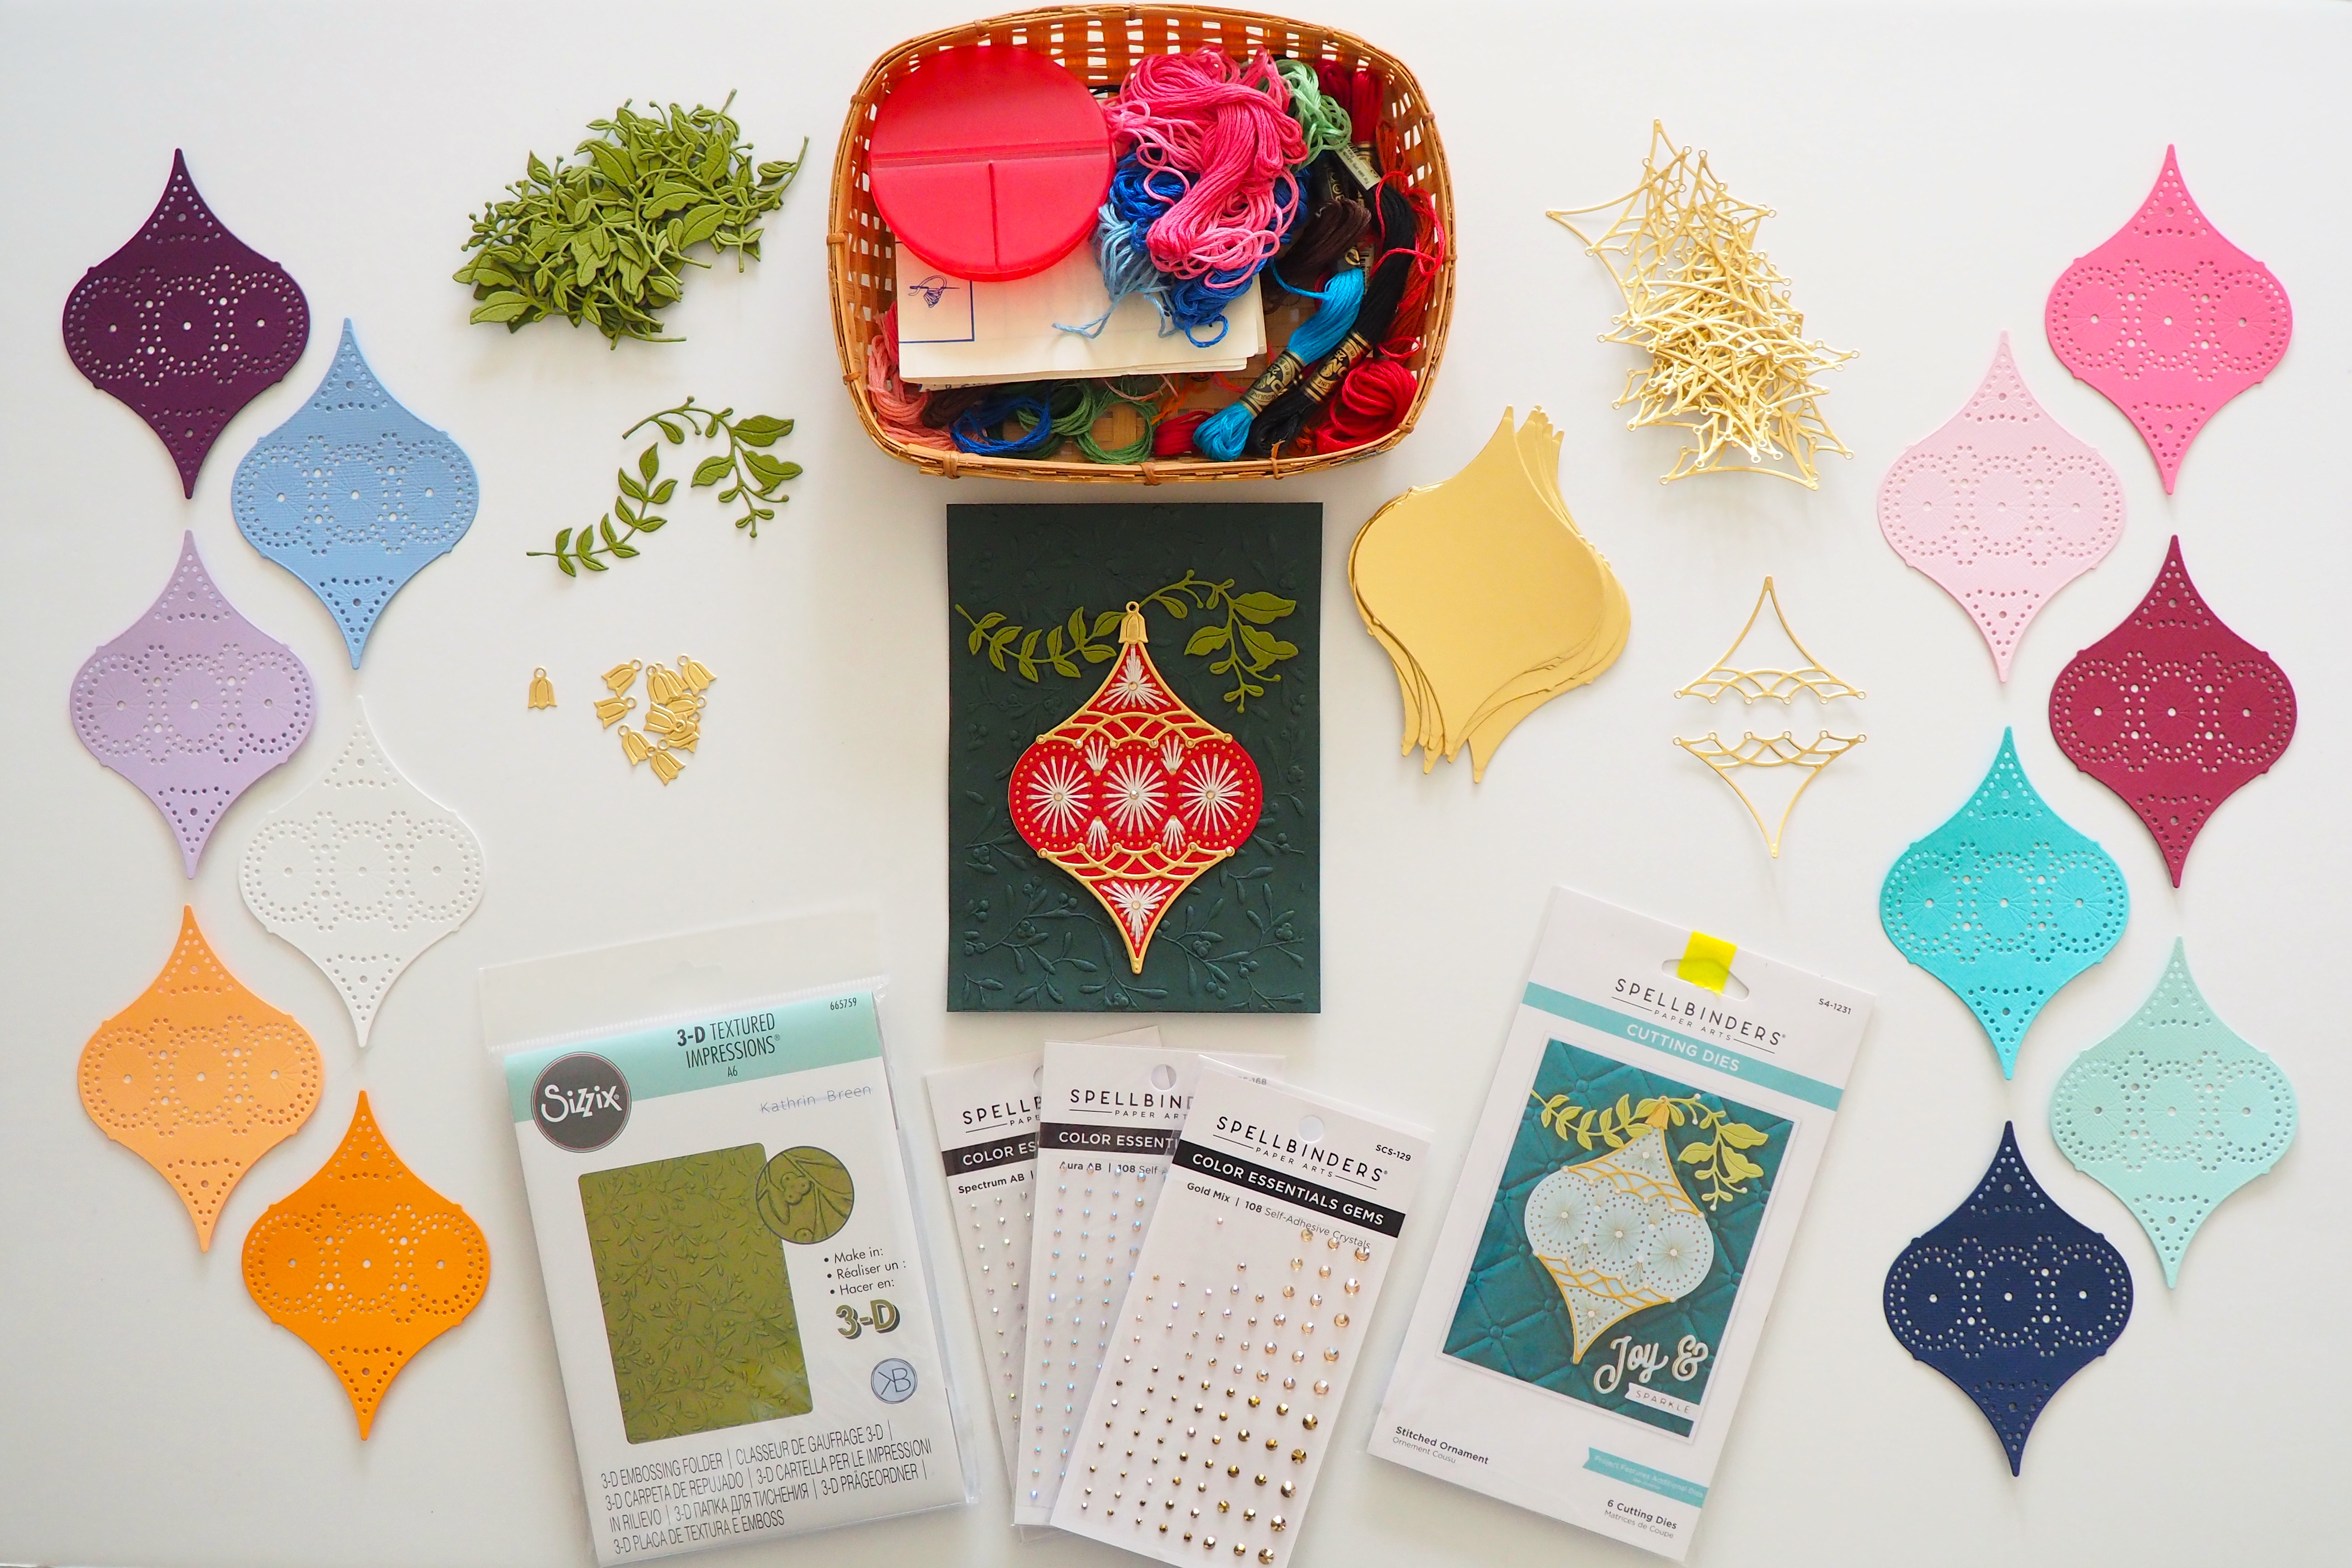
The main attraction on these new cards is a die cut ornament stitched with embroidery floss, decorated with a gold filigree-like element on the top and bottom, embellished with tiny sparkly gems, and finished with a fancy hanger top. The light green leaf sprigs are also part of the die set.

For each ornament I used the Spellbinders Stitched Ornament detailed cutting die set to cut the shapes shown above using my Sizzix Big Shot machine.

For the red finished ornament, (seen in the middle of the above photo and below), I first stitched the white floss to the red top piece, then glued it to one of the gold back pieces, then glued all the other die cut pieces and the Spellbinders Color Essentials gold gems onto the top.

Under The Plum Blossom Tree, DIY: Handmade Christmas Cards, a blog post about making Christmas cards from colorful card stock papers which have been cut from metal dies, hand stitched and have gold embellishments and gems attached.

The dark green card base was made by running a Sizzix 3-D Textured Impressions embossing folder in the Delicate Mistletoe pattern through my Sizzix machine. Right now the stitched ornament is just sitting on the card base as a kind of mock up as I haven't figured out the exact placement yet.

I also have a Spellbinders Mini Christmas Greetings stamp and die cutting set (not shown) that I will use to add the sentiments to the front and inside of the cards.

Who knows how many of the one dozen ornament shapes plus embellishments that I will actually get stitched and assembled so I’m sharing what I have so far! As you can see, this is an ambitious project I’ve set myself up for but I'm hoping to get about eight of them made before Christmas. (Now I'm understanding why the professional crafts people start their projects in July!) With work, family and all the other holiday activities happening I’m trying not to stress myself. Nuff said, right?

So I'll just be over here stitching and gluing whenever I can and hopefully I'll have more to share in a week or so.

Thanks for looking and bye for now.

SHARE:

Wednesday, November 23, 2022

DIY: Autumn Blessings Handmade Greeting Cards

Under The Plum Blossom Tree DIY: Autumn Blessings Handmade Greeting Cards, a blog post showing paper greeting cards made using a die cut machine and metal dies which are then glued onto a card base.

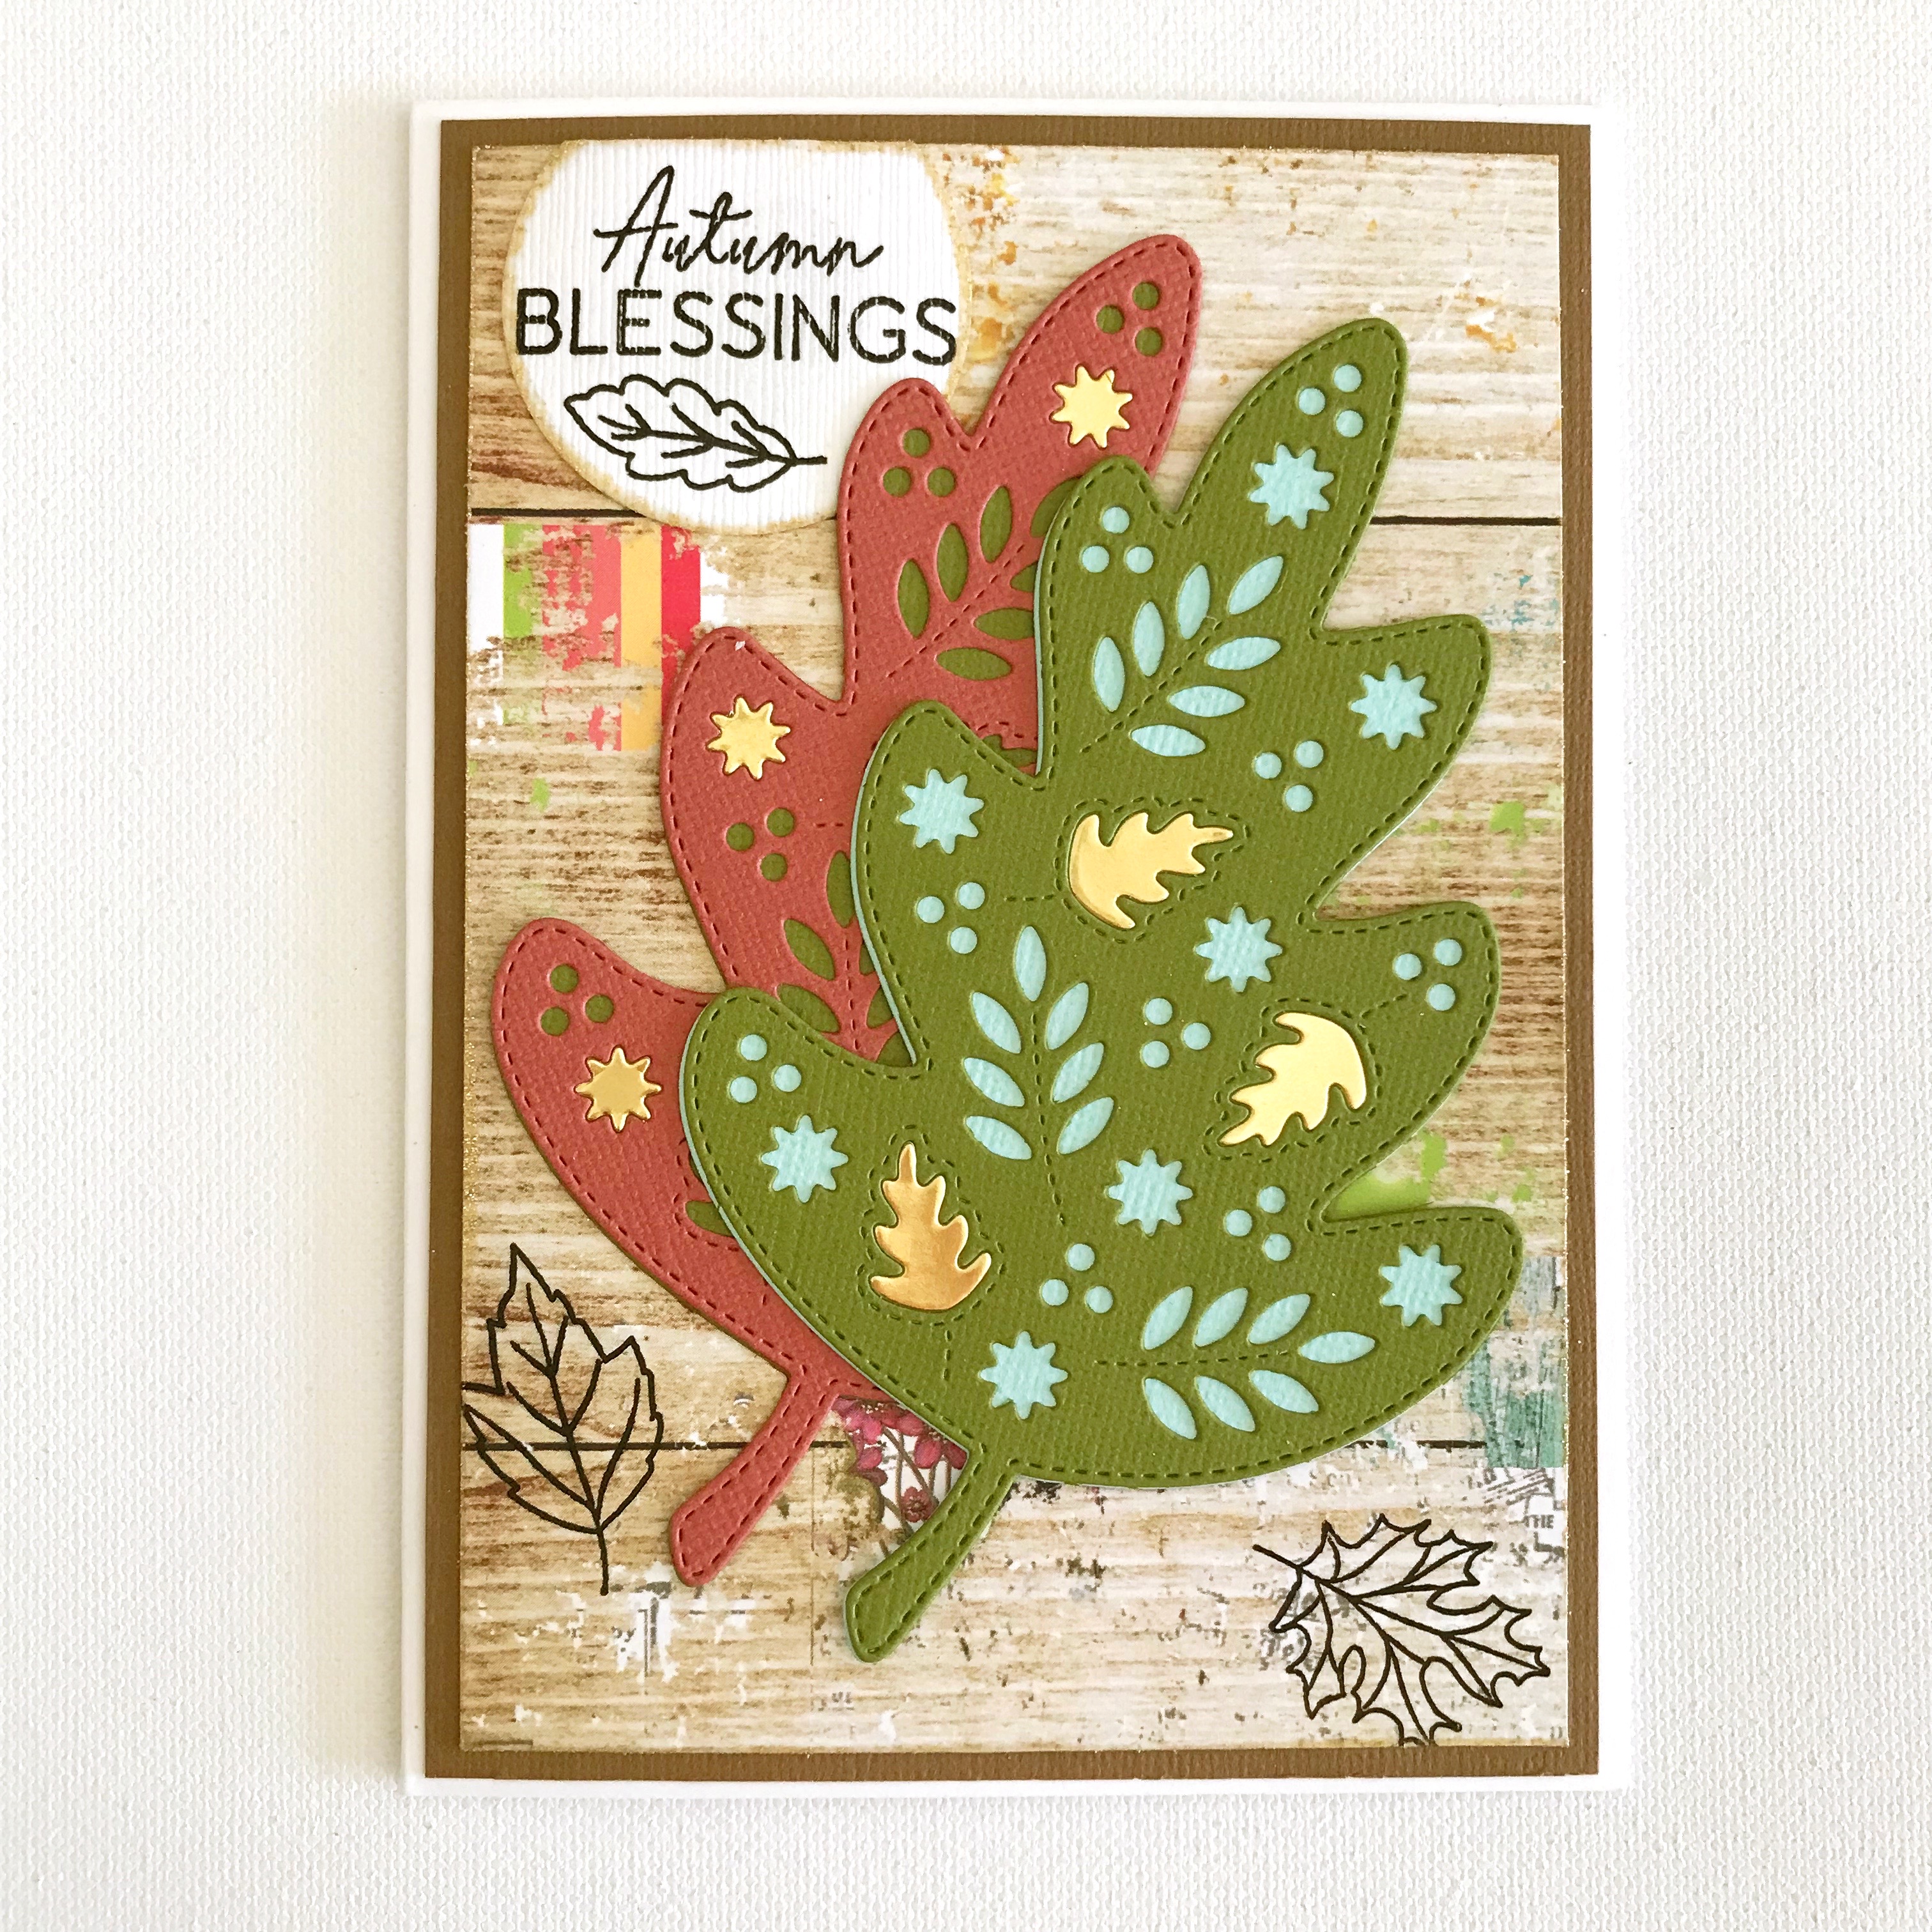
Hello friends! I'm so excited to show you this group of four 'Autumn Blessings' handmade greeting cards I recently crafted to send to my cousins. These incredible leaves were made with my Sizzix Big Shot Die Cutter, and the Concord and 9th Triple Step Autumn Leaf Dies.

Each leaf is a double layer - the bottom layer is a solid leaf and the top layer is a pattern. The bottom layer is cut from a leaf-shaped outline die and the top layer is cut from a patterned die that fits inside the leaf-shaped outline die. When glued together, the leaves become dimensional and are so colorful. The possibilities for color combinations are endless. This is a great way to use up your card stock scraps. I had fun looking through mine and creating the color combinations shown here.

Under The Plum Blossom Tree DIY: Autumn Blessings Handmade Greeting Cards, a blog post showing paper greeting cards made using a die cut machine and metal dies which are then glued onto a card base.

To make the cards, I first applied Recollections Sparkle embossing powder to a piece of Webster's Pages 'Begin Again' wood grain paper (I think it was produced around 2016) and to the white card stock circle embellishment (punched using a circle punch) using Honey Bee clear embossing ink and set them with my heat tool. (I bought my heat tool years ago but here are some options if you want one.)

I then created a card base by gluing a piece of brown card stock onto a Tonic Studio A6 card base and then glued the embossed Webster's Pages paper on top of the brown card stock. I glued each leaf pair together and then adhered onto the base, along with the white circle which I trimmed along the top. And lastly, I wanted to add a little more gold so I die cut more leaves from a piece of Lawn Fawn Metallic card stock (saved for another project) and glued some of the leaf and star-like cut outs into a few of the cut out portions of the leaves.

Under The Plum Blossom Tree DIY: Autumn Blessings Handmade Greeting Cards, a blog post showing paper greeting cards made using a die cut machine and metal dies which are then glued onto a card base.

I used black ink to stamp the 'Autumn Blessings' sentiment from the Spellbinders Fall Greetings stamp set and the three Paige Evans Garden Shoppe leaves (a Scrapbook.com exclusive freebie now gone) using my MISTI stamp tool.

Under The Plum Blossom Tree DIY: Autumn Blessings Handmade Greeting Cards, a blog post showing paper greeting cards made using a die cut machine and metal dies which are then glued onto a card base.

On the inside of the card I stamped the 'May the Season's Bounty fill your heart' sentiment from the same Spellbinders Fall Greetings stamp set, again using the MISTI stamp tool.

Under The Plum Blossom Tree DIY: Autumn Blessings Handmade Greeting Cards, a blog post showing paper greeting cards made using a die cut machine and metal dies which are then glued onto a card base.

And that's it! Which one is your favorite?

If you have any questions, let me know!

SHARE:

Sunday, October 9, 2022

DIY: Decoupage Chinoiserie Mini Pumpkins

Under the Plum Blossom Tree, DIY: Decoupage Chinoiserie Mini Pumpkins, a blog post lesson in how to create autumn season faux decoupage pumpkins to use as holiday decorations.

Hello friends! October is here and it's time to get crafty with some faux mini pumpkins! As one who enjoys making scrapbook pages, decoupage is another fun way to be creative with paper. And while I'm new to this wildly popular activity, despite some challenges, I managed to come up with the three designs shown.

It's actually very easy, just tedious and messy.

So let's gather our supplies:

Under the Plum Blossom Tree, DIY: Decoupage Chinoiserie Mini Pumpkins, a blog post lesson in how to create autumn season faux decoupage pumpkins to use as holiday decorations.

You will need:

Step 1 - Apply white acrylic paint to the surface of each of your pumpkins. The paint will provide 'grip' for your napkins to adhere to. I used white because my pumpkins have a lot of negative space showing. You might consider the colors in your napkins as to what your choice of paint color would be.

Under the Plum Blossom Tree, DIY: Decoupage Chinoiserie Mini Pumpkins, a blog post lesson in how to create autumn season faux decoupage pumpkins to use as holiday decorations.

Step 2 - Separate the printed layer of your napkin from the other one or two layers. You only need the printed layer. It will be very thin.

Under the Plum Blossom Tree, DIY: Decoupage Chinoiserie Mini Pumpkins, a blog post lesson in how to create autumn season faux decoupage pumpkins to use as holiday decorations.

Step 3 - Fussy cut your desired elements from your napkin. This is not an exact process - you don't have to cut on the lines and your cuts do not have to be perfect.

Under the Plum Blossom Tree, DIY: Decoupage Chinoiserie Mini Pumpkins, a blog post lesson in how to create autumn season faux decoupage pumpkins to use as holiday decorations.

It's a good idea to cut little snips around the perimeter of your cut-out shape. It helps the image ease onto the round pumpkin better.

Under the Plum Blossom Tree, DIY: Decoupage Chinoiserie Mini Pumpkins, a blog post lesson in how to create autumn season faux decoupage pumpkins to use as holiday decorations.

Step 4 - Apply a small amount of Mod Podge to your pumpkin in the area where you want to adhere your image. Lightly tack your image to the wet medium and adjust as needed.

Under the Plum Blossom Tree, DIY: Decoupage Chinoiserie Mini Pumpkins, a blog post lesson in how to create autumn season faux decoupage pumpkins to use as holiday decorations.

Apply a thin coat of Mod Podge to the remaining areas behind your tacked image. Now you'll want to work quickly using a generous amount of Mod Podge on your brush to apply the medium over the top of your image using light pressure and working from the middle (where you tacked the image) outward. Keep your brush wet with the medium and gently 'push' the paper into place. Be careful because the more wet your paper becomes the easier it will tear. Don't worry about the wrinkles - they will take care of themselves. Once your image is adhered, use your brush to gently smooth the image to the surface. Again, make sure your brush is wet and use light strokes. Repeat for the remainder of your cut-outs.

Under the Plum Blossom Tree, DIY: Decoupage Chinoiserie Mini Pumpkins, a blog post lesson in how to create autumn season faux decoupage pumpkins to use as holiday decorations.

Here's how I cut my napkins to make the other two pumpkin designs:

Under the Plum Blossom Tree, DIY: Decoupage Chinoiserie Mini Pumpkins, a blog post lesson in how to create autumn season faux decoupage pumpkins to use as holiday decorations.

And here are a couple of ideas I had for embellishing the tops of two of the pumpkins:

Under the Plum Blossom Tree, DIY: Decoupage Chinoiserie Mini Pumpkins, a blog post lesson in how to create autumn season faux decoupage pumpkins to use as holiday decorations.

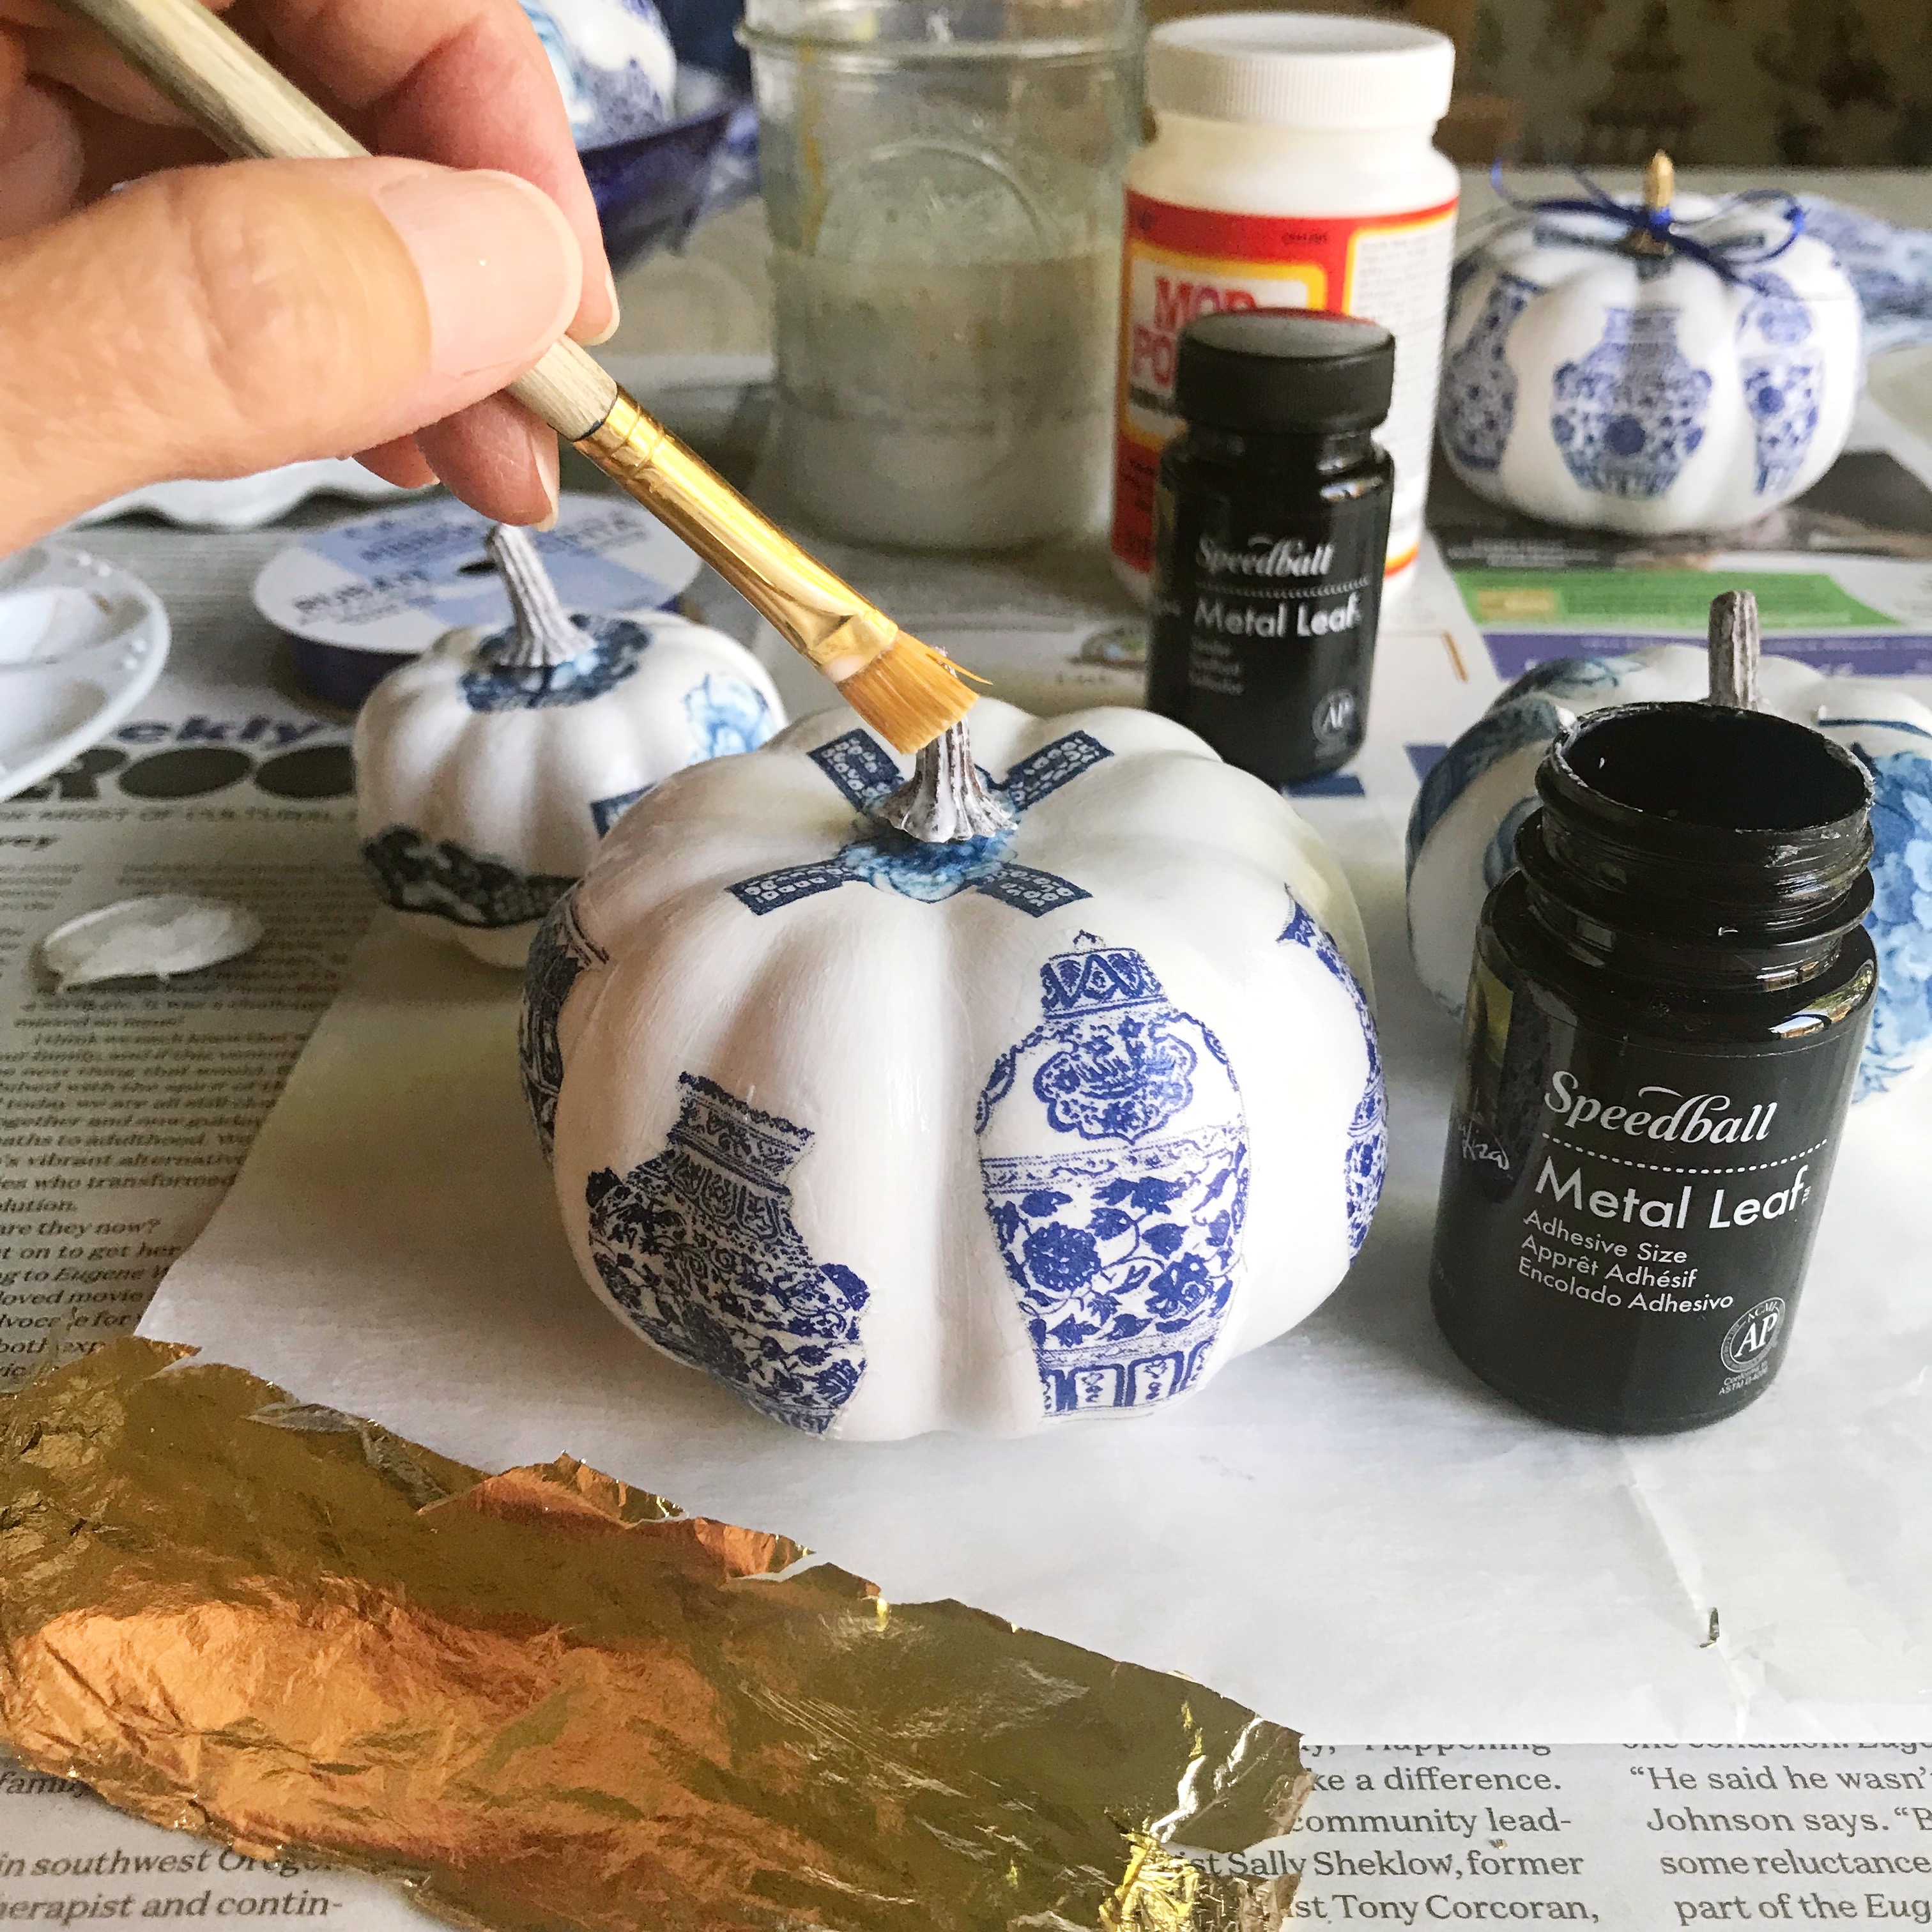
Step 5 - The last step is applying the gold leaf to the stems of the pumpkins. The gold leaf kit has three parts - the adhesive 'size', the metal leaf (thin sheets of metal) and the sealer. (Tip: pull the stems of your pumpkins up about 1/4" so there is a gap - this will make applying the gold leaf easier.) First, apply the adhesive size with a paint brush. The size is very watery so use caution when dipping your brush into it. Be sure your brush goes into the crevices of the pumpkin stem. Let the size dry to a tacky consistency.

Under the Plum Blossom Tree, DIY: Decoupage Chinoiserie Mini Pumpkins, a blog post lesson in how to create autumn season faux decoupage pumpkins to use as holiday decorations.

After the size becomes tacky, cut a piece of the gold leaf. It should be larger than the surface area that you want to cover. Hold the gold leaf up to your pumpkin stem and use a dry paintbrush to gently push the leaf onto the stem. When you see the leaf is adhered to the stem, gently work the leaf into the crevices with your brush.

Under the Plum Blossom Tree, DIY: Decoupage Chinoiserie Mini Pumpkins, a blog post lesson in how to create autumn season faux decoupage pumpkins to use as holiday decorations.

Push the leaf with your brush so that it goes under the stem (see tip above). Gently work your way around the stem with your brush until the leaf is adhered to all the tacky areas. As you cover the size, the still dry parts of the leaf will begin to fall away.

Under the Plum Blossom Tree, DIY: Decoupage Chinoiserie Mini Pumpkins, a blog post lesson in how to create autumn season faux decoupage pumpkins to use as holiday decorations.

And lastly, apply the sealer to the stems with a paintbrush and let dry completely. Now you can push your stems back down onto the surface of your pumpkins.

Under the Plum Blossom Tree, DIY: Decoupage Chinoiserie Mini Pumpkins, a blog post lesson in how to create autumn season faux decoupage pumpkins to use as holiday decorations.

Step 6 - Tie some ribbon to the stems and you are done! Now you have a beautiful hand made craft to enjoy every autumn season for years to come.

Under the Plum Blossom Tree, DIY: Decoupage Chinoiserie Mini Pumpkins, a blog post lesson in how to create autumn season faux decoupage pumpkins to use as holiday decorations.

If you made it this far, thank you for looking! If you have any questions, please leave a comment.


SHARE:

Sunday, June 26, 2022

Hey There Tree Climber! A Scrapbook Layout

Under The Plum Blossom Tree, Hey There Tree Climber! scrapbook page by June Anderson

Hey There! I've always meant to share more scrapbook pages, but alas, as I look back at what I've posted here in the past, there isn't much! So today I'm publishing this layout about my son Tayo that I just finished.

Scrapbook pages are both a labor of love and (for me anyway) a labor intense activity. I spend a lot of time thinking about the stories that I want to tell and how I can best portray the character or characters and describe the event. I also spend a lot of time thinking about what the visual representation of the story looks and feels like. Traditional pages, like that above, are a fun and creative way to represent events, milestones or personality traits.

As well, the act of making a page is a vigorous mental activity that I enjoy getting lost in. Like collage, I enjoy solving design problems and spend quite a bit of time just sitting with everything in front of me and experimenting. A part of my brain gets very charged from this activity so I tend to want to stay there!

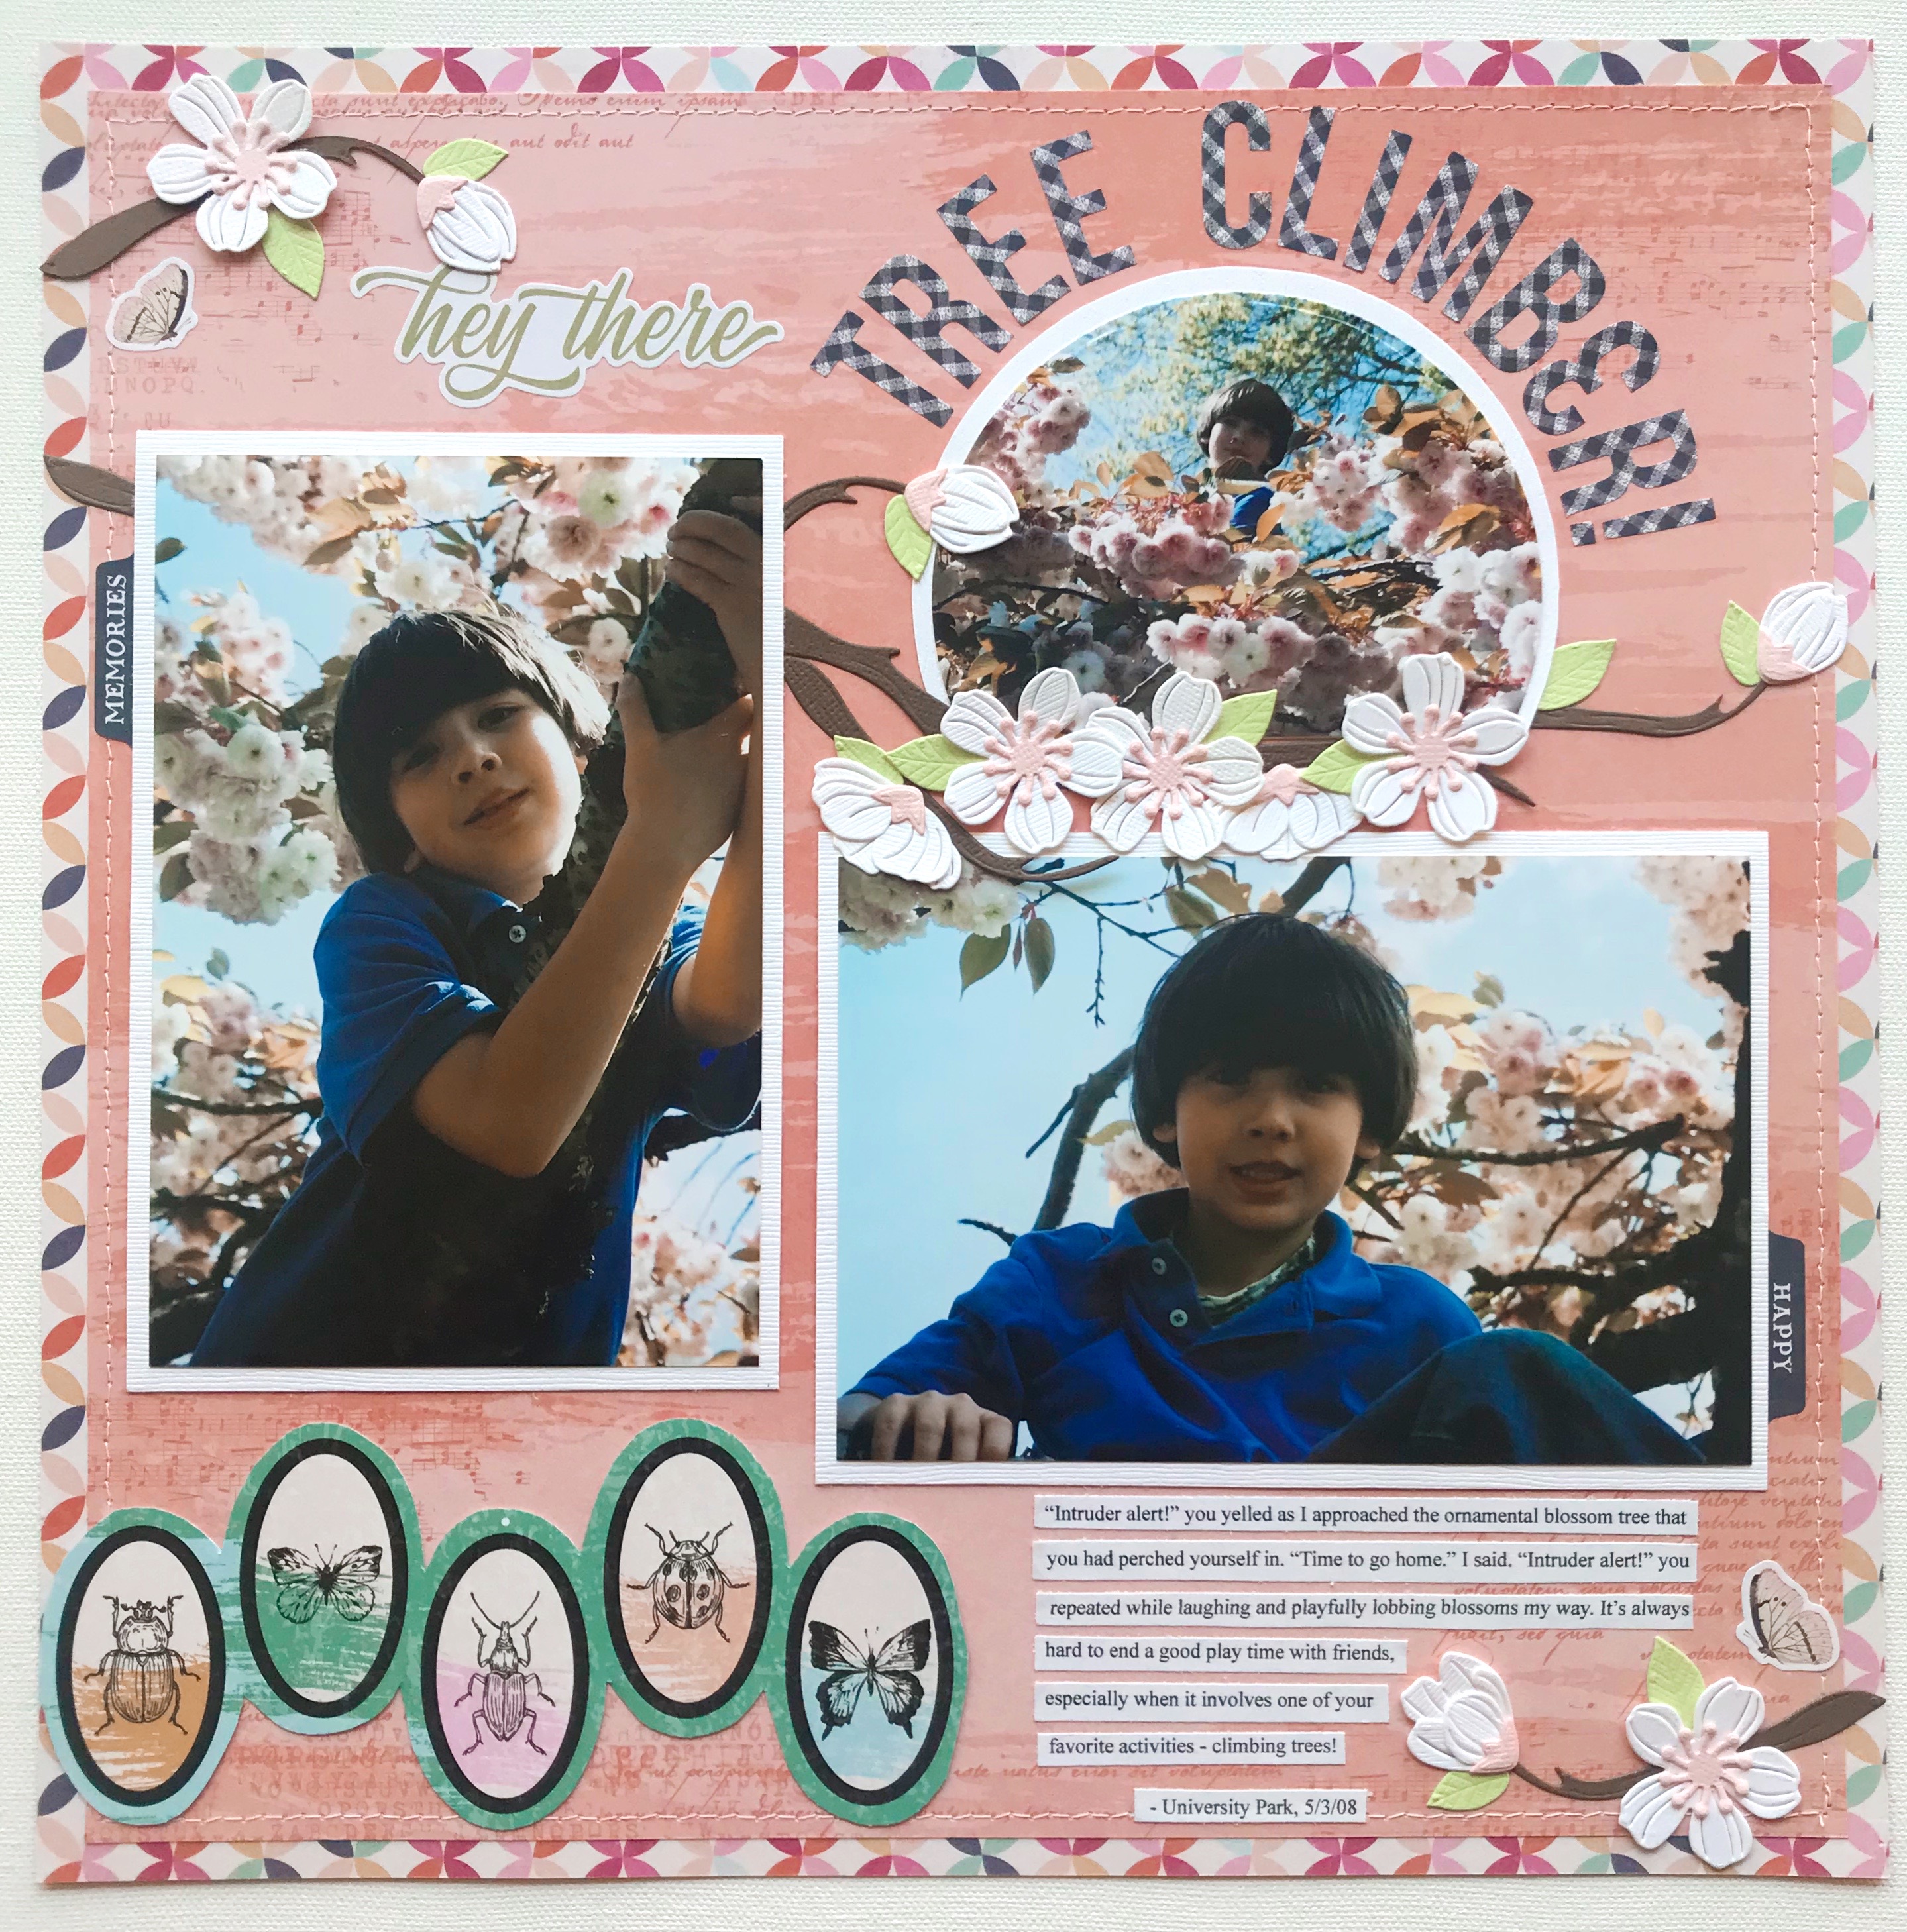
This page, titled Hey There Tree Climber! addresses both Tayo's love of tree climbing and showcases his sweet nature at age eight. There a quite a few photographs through the years of him climbing trees but I chose this particular set of photos because I was anxious to try out my new Spellbinders Layered Cherry Blossom cutting dies. Cherry or Plum Blossoms appear quite frequently around our house so I know I will get a lot of mileage out of this die set. In fact, I plan to make more scrapbook pages and some greeting cards as well.

For the base of my page I used two sheets of 12" x 12" Beautiful Things paper from BoBunny: Garden Party and Beauty. Before machine stitching the Beauty paper to the Garden Party paper I cut a section out of the middle of the Garden Party paper and set it aside for another project.

Each of the three photos are matted with Bazzill Avalanche cardstock.

The ornate florals are also cut from Avalanche cardstock and the remainder of the flower buds and branches are cut from leftover Bazzill bits and pieces. The details of the flowers are amazing! In fact once I had all the pieces cut I kept them in a vintage tray that was decorated with cherry blossoms and I got fooled more than once!

Under The Plum Blossom Tree, Hey There Tree Climber! scrapbook page by June Anderson

It took me a long time to maneuver the main branches and flowers into place while at the same time making sure there was room for the title and journaling.

The title, as well as the two moth stickers and the tabs on the sides of the photos are all from the Simple Stories Simple Vintage Indigo Garden Sticker Book. The journaling is printed onto copy paper. And finally, the insects at the bottom left of the page are cut from a sheet of 12" x 12" BoBunny Beautiful Things Collected paper.

And that's it! I'm happy how this page turned out and I hope you enjoyed seeing it.

Thanks for looking and bye for now!


SHARE:

Monday, May 23, 2022

DIY: Handmade Greeting Cards

Hello Friends! It's been so long since I've given my blog some love. Life since Covid has felt heavy and since my mom passed away last November my momentum to pick up the pieces has been slow...

I'm here today to share with you three greeting cards that I made recently using my new Sizzix manual die cut machine. It's so easy to get a perfect clean cut every time and the detail is amazing.

All of the papers shown here are from the new Bo Bunny Beautiful Things 6 x 8 paper pad. This size is perfect for card making because the images are scaled down and there is minimum waste. The bits of paper that are leftover can be used for die cutting the small die shapes which is fun if you are a 'mix and match' kind of crafter!

Each of the cards are made using a standard A6 size card blank from Tonic Studios.

As well, all three cards utilize the Sizzix Window Box stamps and die set by Olivia Rose, which I adore. 'Shaker box' type greeting cards are very popular right now and when I saw this particular set I knew I wanted to give it a try.

And finally, each of the three different sentiments are from the Elegant Sentiments stamps and die set from Waffle Flower Crafts.

For the background on the card to the left, above, I chose the Blooms paper (links are to the 12 x 12 sizes):

I stamped the scalloped circle using black pigment ink onto the B side of the Memorable paper and then die cut the shape. Both the stamp and die are part of the Sizzix Window Box set. I used one of the circle dies that came with my die cut machine to cut the background of the shaker box out of the Flutter paper. I also die cut a scalloped circle from a sheet of double sided foam adhesive from Scrapbook.com. And finally, I cut a circle shape (same size as the Flutter circle) from some leftover packaging material for the "window". Then it was a matter of layering these pieces together and adding the decorative sequins to create the shaker box. For this card I chose the Early Spring Premium Sequins from 28 Lilac Lane.

The next step was to stamp and die cut the floral bloom and die cut the six leafy embellishment pieces using the Sizzix Window Box set. The embellishment arrangements on all three cards are cut from the B side of the Blooms paper. This paper allowed me to create some very interesting variations in both color and gradations of color.

And lastly, I chose the 'Happy Birthday' sentiment from the aforementioned Elegant Sentiments stamps and die cut set, ink stamped it, and then die cut it from the B side of the Beauty paper.

The background of the middle card is made with the Fly Away paper:

Both the scalloped circle and the sentiment are stamped using black pigment ink and then die cut from the same B side of the Memorable paper as the previous card. The circle background inside the scalloped circle is plain white card stock. Again, I repeated the layering of the double sided foam adhesive, and a die cut circle from product packaging for the window. The floral bloom and leafy embellishments (from the Sizzix Window Box set) are also die cut from the same B side of the Blooms paper as the previous card.

For the shaker 'ingredients' I mixed Early Spring and Rose in Flight Premium Sequins from 28 Lilac Lane. For additional interest I glued two of the Rose in Flight butterflies to the background.

I chose the 'Thinking of You' sentiment from the previously mentioned Elegant Sentiments set.

The card on the right is made with the Dotted paper:

Again, I used the Waffle Flower Elegant Sentiments stamps and die set to stamp the 'Thank You' sentiment and die cut it and the scalloped circle (after ink stamping it as well) from the B side of the Beauty paper. The shaker box is layered with the double sided foam adhesive and some clear packaging, then filled with the same two sequin styles as the previous card. The Sizzix Window Box floral bloom and leafy embellishments are die cut, again, from the Blooms paper after having ink stamped the floral bloom.

And that's it! If you have any questions about the products used or my process, please reach out.

I had so much fun creating these cards. In fact, I made each card for a cousin and two of them will be posted today. I can't wait for the two cousins to receive their handmade cards. It's especially sentimental because I have not seen either of them since childhood and with my mother's passing we have come into contact and I want to keep in touch.

Speaking of keeping in touch, I have plans for a few more blog posts, so wish me luck!

And, as my mother would always say, bye for now... 

SHARE:

Friday, October 30, 2020

DIY: Painted Mini Halloween Pumpkins & a Día de Los Muertos Skull Banner

Under The Plum Blossom Tree blog DIY Painted Mini Halloween Pumpkins & a Día de Los Muertos Banner, Halloween craft, Halloween painting activity, fun Halloween project, painting pumpkins for Halloween, mini pumpkin painting, painting mini pumpkins, orange and black painted mini pumpkins, gold painted mini pumpkins, hand drawing on mini pumpkins, Día de Los Muertos skull banner, hand made Día de Lost Muertos skull banner, Day of the Dead skull banner, hand made Day of the Dead skull banner

Hello and Happy Halloween friends!

This is indeed the strangest Halloween ever. Our city is heavily discouraging trick-or-treating, gatherings, corn mazes - all the traditional group activities. So I'm guessing there are many parents out there coming up with ideas for new ways to celebrate Halloween that don't include getting sick with the coronavirus. I'll bet pumpkin painting is on the list!

For this easy-peasy project, I bought three different kinds of ornamental pumpkins in three sizes and decorated each type the same.

Under The Plum Blossom Tree blog DIY Painted Mini Halloween Pumpkins & a Día de Los Muertos Banner, Halloween craft, Halloween painting activity, fun Halloween project, painting pumpkins for Halloween, mini pumpkin painting, painting mini pumpkins, orange and black painted mini pumpkins, gold painted mini pumpkins, hand drawing on mini pumpkins, Día de Los Muertos skull banner, hand made Día de Lost Muertos skull banner, Day of the Dead skull banner, hand made Day of the Dead skull banner

For the large white pumpkins, I chose black and orange paint and black and orange decorative ribbons. To make the stars, I traced around two different sized chipboard stars with a Sharpie marker, then painted them in with black tempera paint. The plaid and polka dots were painted free hand.

Under The Plum Blossom Tree blog DIY Painted Mini Halloween Pumpkins & a Día de Los Muertos Banner, Halloween craft, Halloween painting activity, fun Halloween project, painting pumpkins for Halloween, mini pumpkin painting, painting mini pumpkins, orange and black painted mini pumpkins, gold painted mini pumpkins, hand drawing on mini pumpkins, Día de Los Muertos skull banner, hand made Día de Lost Muertos skull banner, Day of the Dead skull banner, hand made Day of the Dead skull banner

For the small white pumpkins, I chose gold paint, gold wire 'vines' and velvety autumn colored leaves. Hint: to make the wire vines I wrapped the wire around a pencil, then slipped it over the stem.


Under The Plum Blossom Tree blog DIY Painted Mini Halloween Pumpkins & a Día de Los Muertos Banner, Halloween craft, Halloween painting activity, fun Halloween project, painting pumpkins for Halloween, mini pumpkin painting, painting mini pumpkins, orange and black painted mini pumpkins, gold painted mini pumpkins, hand drawing on mini pumpkins, Día de Los Muertos skull banner, hand made Día de Lost Muertos skull banner, Day of the Dead skull banner, hand made Day of the Dead skull banner

And for the little orange pumpkins I painted the stems gold and then used my favorite white Gelly Roll pen for the embellishing.

Under The Plum Blossom Tree blog DIY Painted Mini Halloween Pumpkins & a Día de Los Muertos Banner, Halloween craft, Halloween painting activity, fun Halloween project, painting pumpkins for Halloween, mini pumpkin painting, painting mini pumpkins, orange and black painted mini pumpkins, gold painted mini pumpkins, hand drawing on mini pumpkins, Día de Los Muertos skull banner, hand made Día de Lost Muertos skull banner, Day of the Dead skull banner, hand made Day of the Dead skull banner


I made the Día de Los Muertos banner a few years ago and I still love it. I simply drew one skull to use as a template and cut five out of white cardstock, drew in the facial features, and gave each a floral head piece. I then mounted them on the banners which are hand cut from a sheet of 12 x 12 Bo Bunny scrapbook paper, which I embossed with gold embossing powder around the outside edges.

Under The Plum Blossom Tree blog DIY Painted Mini Halloween Pumpkins & a Día de Los Muertos Banner, Halloween craft, Halloween painting activity, fun Halloween project, painting pumpkins for Halloween, mini pumpkin painting, painting mini pumpkins, orange and black painted mini pumpkins, gold painted mini pumpkins, hand drawing on mini pumpkins, Día de Los Muertos skull banner, hand made Día de Lost Muertos skull banner, Day of the Dead skull banner, hand made Day of the Dead skull banner


And last but not least, in order to give my vignette above an extra wow factor, I filled my little plaster 'boo pumpkin' with seasonal mums. This is my only vintage Halloween decoration and I am crazy about it. I love that facial expression!

Under The Plum Blossom Tree blog DIY Painted Mini Halloween Pumpkins & a Día de Los Muertos Banner, Halloween craft, Halloween painting activity, fun Halloween project, painting pumpkins for Halloween, mini pumpkin painting, painting mini pumpkins, orange and black painted mini pumpkins, gold painted mini pumpkins, hand drawing on mini pumpkins, Día de Los Muertos skull banner, hand made Día de Lost Muertos skull banner, Day of the Dead skull banner, hand made Day of the Dead skull banner


Thank you for looking and have a safe and fun Halloween (insert blood curdling scream here)!

SHARE:

Sunday, April 16, 2017

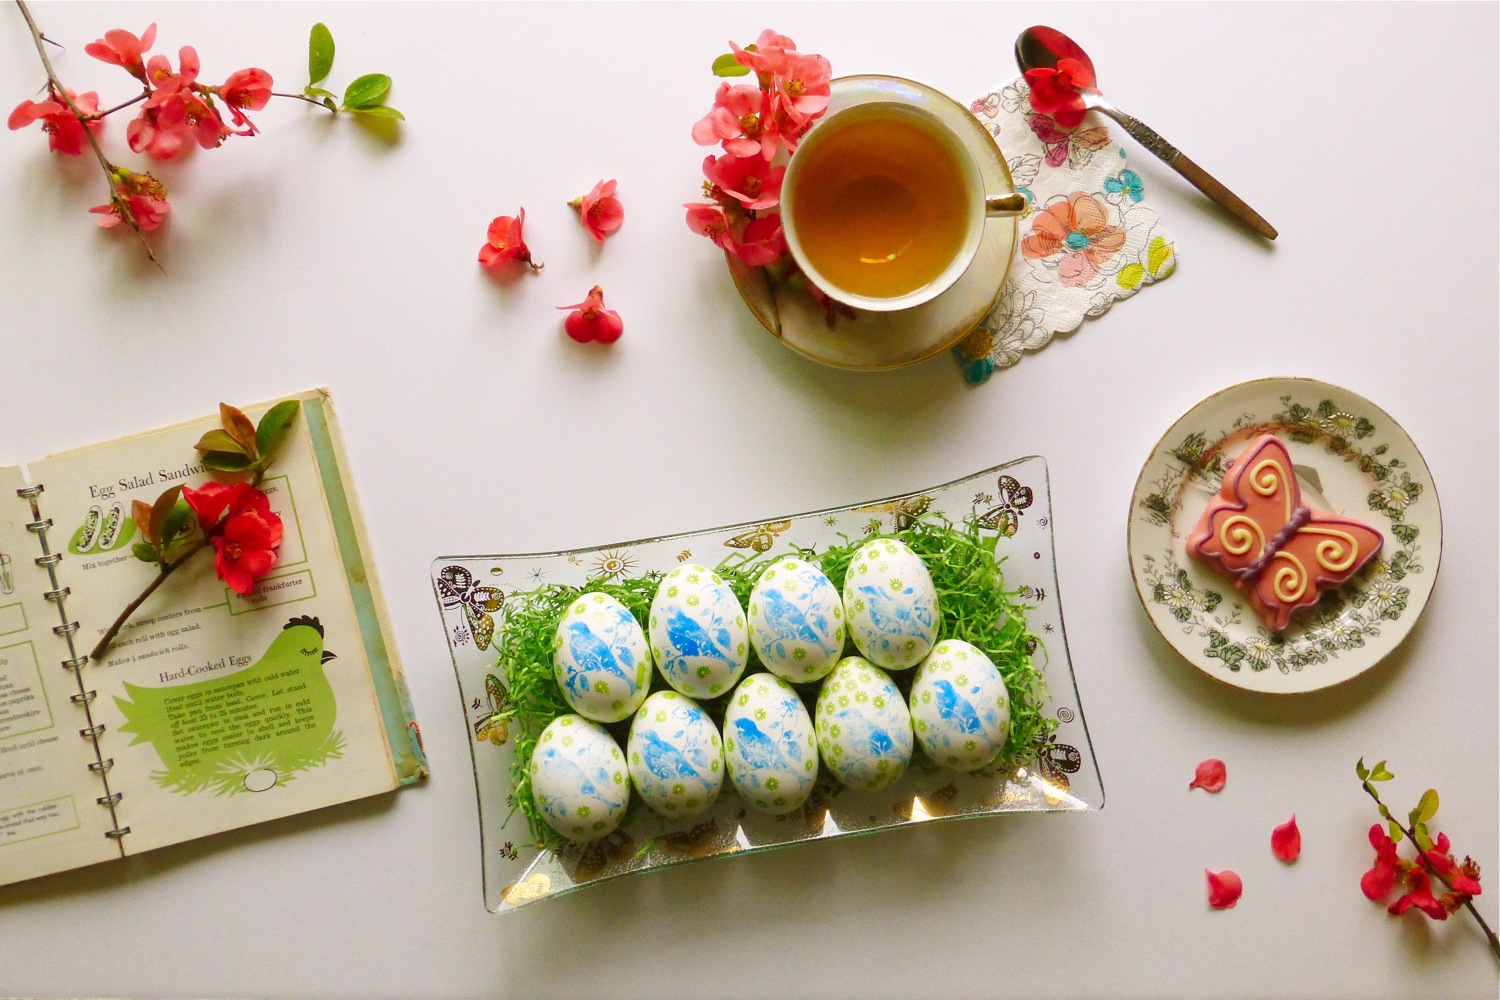
Hand Ink-Stamped Easter Eggs

hand stamped Easter eggs, martha stewart craft idea, Easter crafts, Easter eggs, vintage Betty Crocker cookbook, Georges Briard serving dish, quince, spring crafts, teatime with hand stamped Easter eggs

Hi Friends! I spent some time this weekend making ink stamped Easter eggs. The front cover of this month's Martha Stewart Living magazine features some perfectly hand ink-stamped eggs. Also featured in this issue are simple, fun polka dot eggs made with paint and daubers, and beautiful decoupaged eggs using paper doilies. 

The ink-stamped eggs looked interesting, I thought. I have a boat load of scrap-booking supplies, including various colored inks and cute stamps like the bird pictured here, so it was an easy choice.

My eggs are not perfect, but it was a relaxing, enjoyable, quiet activity.

hand stamped Easter eggs, martha stewart craft idea, Easter crafts, Easter eggs, vintage Betty Crocker cookbook, Georges Briard serving dish, quince, spring crafts, teatime with hand stamped Easter eggs

hand stamped Easter eggs, martha stewart craft idea, Easter crafts, Easter eggs, vintage Betty Crocker cookbook, Georges Briard serving dish, quince, spring crafts, teatime with hand stamped Easter eggs

Thanks for looking!


SHARE:

Wednesday, November 30, 2016

#collectandstyle - November Monthly Favorite

OandYStudio, Andrea from OandYStudio, hoop art, wool hoop art, handmade hoop art, handmade wool hoop art, transferware, blue flow transferware, vintage flow transferware, vintage blue flow transferware

Hello everyone, and thank you for visiting Under The Plum Blossom Tree blog! I'm so excited that you're here, and thrilled to introduce you to this month's #collectandstyle Monthly Favorite: Andy of oandystudio!

As you can tell from the image above, Andrea Brinkley is both a collector of vintage blue and white china ware, and also a master fiber artist. Andrea creates one-of-a-kind hand embroidered wool art, or 'stitch painting' as she likes to call it, featuring botanicals and flowers.

She had posted an image at #collectandstyle a few months ago of a very unique blue and white teacup and saucer set that she had given to her mom when Andy was fourteen. I immediately was taken by how she had connected a lovely story from her past, to her current love of collecting blue and white china:

#ihavethisthingwithblueandwhite, blue and white teacup and saucer, O&Y Studio, Andrea Brinkley of O&Y Studio, vintage blue and white teacup and saucer

Since that time, I've enjoyed seeing more of Andy's images of her beautifully styled blue and white china ware, along with her delicious looking French tarts, flowers, and the landscape and scenery surrounding her adopted town in North Carolina (Andy is from South Africa). Then, I noticed a shift in focus, and with this image, Andy began talking about how she is intentionally working at fulfilling a creative dream:

O&Y Studio wool fiber art, wool fiber art by O&Y Studio, oandystudio on Instagram

When Andy posted the above image, she wrote:

"For several years I've been writing down ideas and aspirations in my Big Ideas notebook. I have let many interruptions (big ones like illness and a wedding and small ones too mundane to mention) delay my goals. With much prodding, love and encouragement, I am happy to say I've been making a good start lately. I'll be sure to keep you posted."

And in just the past couple of months, BOOM! - Andy opened her Etsy shop, oandystudio, and has been hard at work, stocking it full of her gorgeous original hoop embroidery designs such as the first image you saw at the top of this post.

Do you find this story inspiring? Do you have a creative dream? My feeling is that for all of us women in the creative community, there is a lot of value in watching another's dream come true. It can inspire us to take up challenges we have set for ourselves, to inspire others, and to work to lift one another up.

I plan on continuing to follow Andy on her creative adventures, both on Instagram and on Etsy and I hope you will too! You can also find Andy on her website oandystudio.com, and on Facebook.

And don't forget, if you are looking for a unique gift for someone special (or for yourself!), I'm sure Andy would be happy to help you choose just the right hoop embroidered floral or botanical wool art piece, lovingly handmade in North Carolina!

Thank you for joining me for the #collectandstyle November Monthly Favorite! And if you would like to know more, and how to join in on all of the fun, please visit my blog post, Collect And Style, A New Instagram Hashtag, right here at Under The Plum Blossom Tree.


SHARE:
© Under The Plum Blossom Tree | All rights reserved.
Blogger Template Created by pipdig