Wednesday, May 31, 2023

Home Sweet Home, A Scrapbook Layout

Home Sweet Home, A Scrapbook Layout

Greetings friends! Today I have a bittersweet scrapbook layout to share with you.

While I'm all for young people growing up and taking on adult responsibilities, it's hard on the heart when not only do they grow up, but they grow their wings and fly away!

My son Tayo and his girlfriend Ellie recently moved into their first apartment. And while I'm so proud of them for having done it all on their own, I'm also very sad to have my second and last child leave home.

So what does a crafty mom do? Make a scrapbook page to commemorate the occasion!

To make this layout, I started with two sheets of Pinkfresh Studio's Happiness Blooms paper. I cut the floral element out of one sheet and used the other sheet for the background.

I traced an old Bazzill pink card stock heart that had scalloped edges onto the 'B' side of Jen Hadfields Picnic Basket paper, cut it out and then cut a smaller heart from white Bazzill card stock and mounted it on top of the Picnic Basket paper. 

The placement of the heart was dependent on the large floral element that I had cut from the Happiness Blooms paper. I aligned the cut floral element directly over the florals on the background paper and slide the heart between them.  When I did that, the right edge hung over the background so I cut that portion off. Once I figured out this main placement, I glued the two heart pieces together and then glued them to the background.

I mounted my photo onto white Bazzill card stock, and glued that to a piece of Pebbles Kid at Heart paper from the 6x8 paper pad. I topped the photo with the 'Home Sweet Home' chipboard from the Paige Evans Bungalow Lane Collection and embellished it with the key sticker from Jen Hadfields Live and Let Grow Collection.

I created a journaling box, which I will fill in later, by cutting a square shape from the B side of Jen Hadfields Bouquet paper, then cut a window out of that and embellished it with the gold butterfly from the same sticker pack as the key sticker above.

The 'We Grow Together' and the 'Happy Day' die cuts are from Jen Hadfields Live and Let Grow ephemera pack.

A date stamped with the Roller Date Stamp from Ali Edwards finishes the page!

What life event has tugged at your heart lately? It's a great idea to document these kinds of events, even if you just write something down in a keepsake journal. Your future self will be so glad you did.

Thanks for looking and see you again next month!

SHARE:

Tuesday, February 28, 2023

December Daily and Stories by the Month

Under The Plum Blossom Tree, December Daily and Stories by the Month, a blog post about keeping my New Year's resolution of documenting more family stories using the Stories by the Month kit by Ali Edwards and her concept of a story a day in the month of December

Hello everyone, how are you doing with your New Year's resolutions so far?

The only one I have this year is to tell more of my family's stories.

The desire to do so came to me last November when I saw that Ali Edwards offers a Stories by the Month kit subscription. Each month you get a small assortment of journaling cards and embellishments, geared towards telling seasonal recurring stories.

At the same time I was seeing that Ali and a lot of the other prominent memory keepers were gearing up for December Daily, which is literally telling one story each day in December, focusing on whatever holiday tradition is being celebrated.

So here is the beginning of my attempts to get those stories told!

This is only my second December Daily. I made the first one ten years ago and of course our lives looked very different then. I'm grateful to my past self for having made that project happen. Knowing how intense the task can be, at first I decided that this year I would just write a small note at the end of each day, and that those accumulated notes would result in one page in my 2022 album. However, as the month progressed I started seeing how those notes could become bigger stories and found myself making a plan to complete an entire album. Now the album is essentially done - there's just a few more items to check off the list.

Under The Plum Blossom Tree, December Daily and Stories by the Month, a blog post about keeping my New Year's resolution of documenting more family stories using the Stories by the Month kit by Ali Edwards and her concept of a story a day in the month of December

In January there was only one big story to tell. My son Tayo got his first apartment with his girlfriend Ellie. Of course such a big life event requires mom getting a photo on the big day and I felt that a large 6 x 8 print was essential in the documenting. I will write in some details on the two journal cards on the left.

Under The Plum Blossom Tree, December Daily and Stories by the Month, a blog post about keeping my New Year's resolution of documenting more family stories using the Stories by the Month kit by Ali Edwards and her concept of a story a day in the month of December

The most appealing idea behind both December Daily and Stories by the Month is that there are no rules about how to document. It just requires that you think about and know your why. For some, December Daily is telling stories every day in the month, while for others it's December 'Daily-ish', acknowledging that there are limits to what one can (or should) get done during a busy hectic month. Same for Stories by the Month - maybe there is only one good story in the month to tell or maybe the plan is to document several smaller stories.

So here is where I'm currently at in my memory keeping journey thus far this year - one big, long story for December and one big important event for January.

It's the last day of February and I had a birthday earlier in the month so I'm hoping to get my photos of that event edited and printed, because, after all the February Stories by the Month kit is just waiting to be crushed, right?

SHARE:

Tuesday, December 13, 2022

DIY: Handmade Christmas Cards

Under The Plum Blossom Tree, DIY: Handmade Christmas Cards, a blog post about making Christmas cards from colorful card stock papers which have been cut from metal dies, hand stitched and have gold embellishments and gems attached.

Hello friends! Once again I am trying my hand at creating some handmade greeting cards, this time for Christmas.

The main attraction on these new cards is a die cut ornament stitched with embroidery floss, decorated with a gold filigree-like element on the top and bottom, embellished with tiny sparkly gems, and finished with a fancy hanger top. The light green leaf sprigs are also part of the die set.

For each ornament I used the Spellbinders Stitched Ornament detailed cutting die set to cut the shapes shown above using my Sizzix Big Shot machine.

For the red finished ornament, (seen in the middle of the above photo and below), I first stitched the white floss to the red top piece, then glued it to one of the gold back pieces, then glued all the other die cut pieces and the Spellbinders Color Essentials gold gems onto the top.

Under The Plum Blossom Tree, DIY: Handmade Christmas Cards, a blog post about making Christmas cards from colorful card stock papers which have been cut from metal dies, hand stitched and have gold embellishments and gems attached.

The dark green card base was made by running a Sizzix 3-D Textured Impressions embossing folder in the Delicate Mistletoe pattern through my Sizzix machine. Right now the stitched ornament is just sitting on the card base as a kind of mock up as I haven't figured out the exact placement yet.

I also have a Spellbinders Mini Christmas Greetings stamp and die cutting set (not shown) that I will use to add the sentiments to the front and inside of the cards.

Who knows how many of the one dozen ornament shapes plus embellishments that I will actually get stitched and assembled so I’m sharing what I have so far! As you can see, this is an ambitious project I’ve set myself up for but I'm hoping to get about eight of them made before Christmas. (Now I'm understanding why the professional crafts people start their projects in July!) With work, family and all the other holiday activities happening I’m trying not to stress myself. Nuff said, right?

So I'll just be over here stitching and gluing whenever I can and hopefully I'll have more to share in a week or so.

Thanks for looking and bye for now.

SHARE:

Wednesday, November 23, 2022

DIY: Autumn Blessings Handmade Greeting Cards

Under The Plum Blossom Tree DIY: Autumn Blessings Handmade Greeting Cards, a blog post showing paper greeting cards made using a die cut machine and metal dies which are then glued onto a card base.

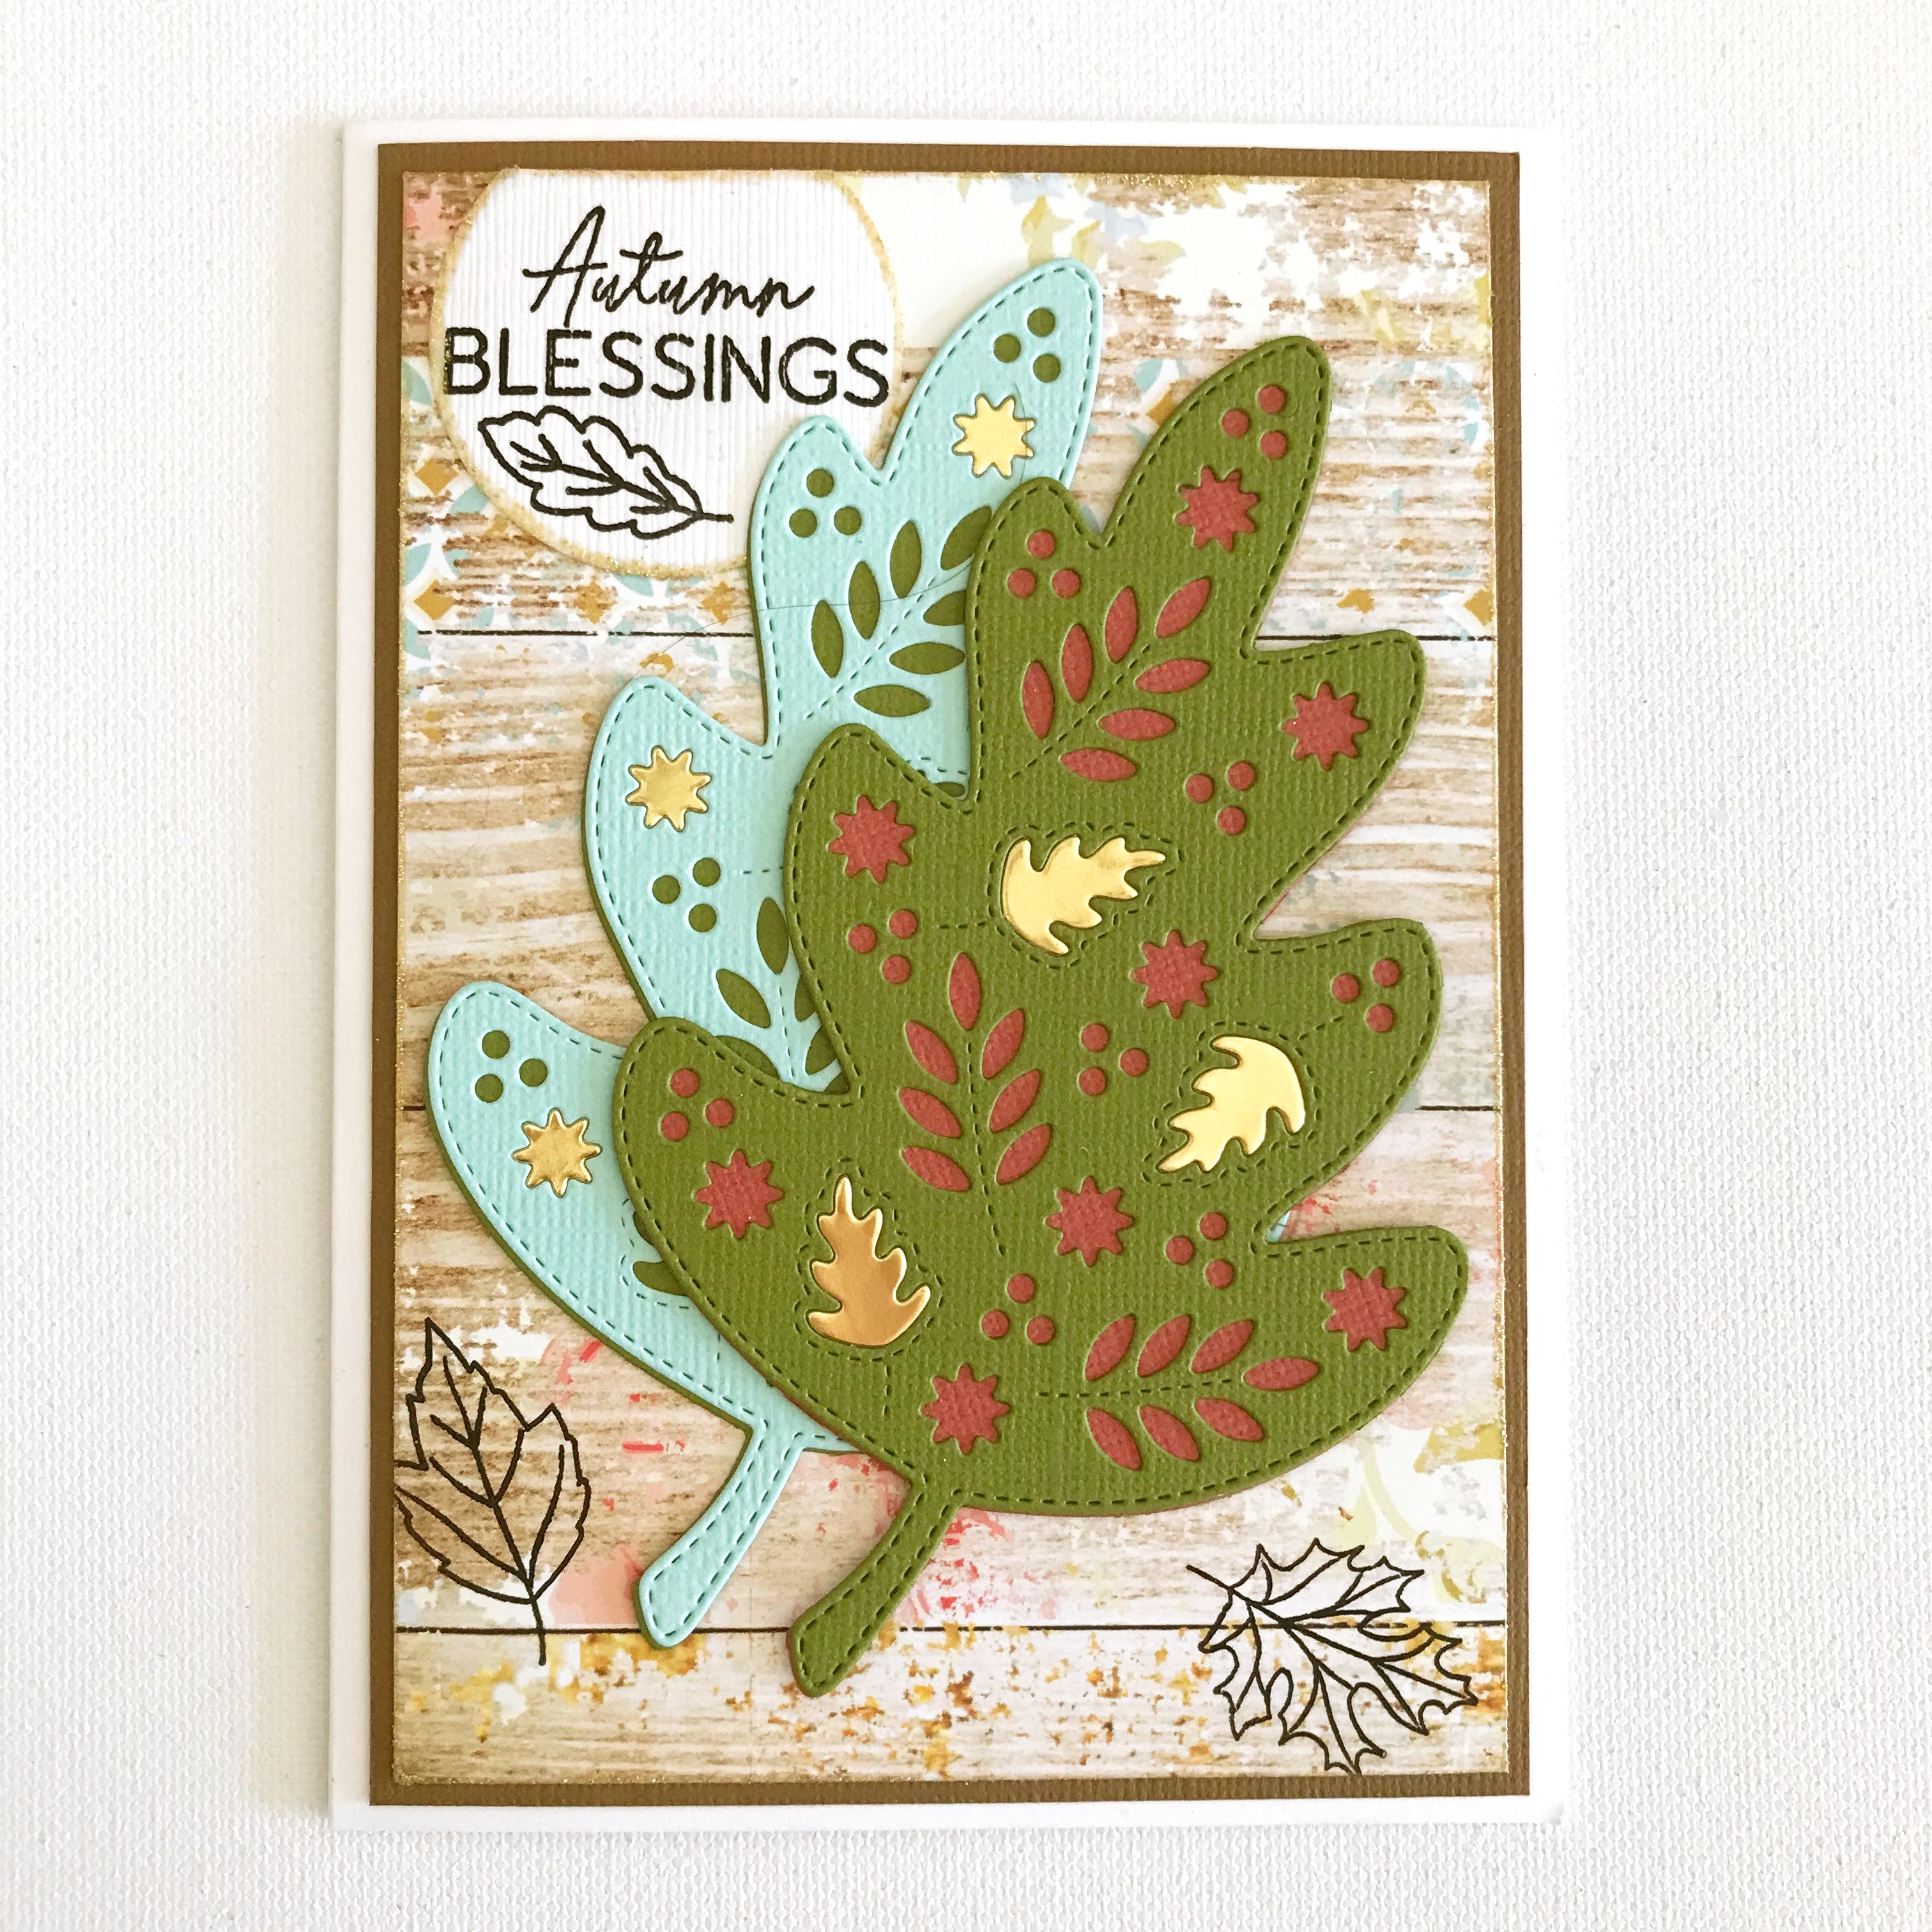
Hello friends! I'm so excited to show you this group of four 'Autumn Blessings' handmade greeting cards I recently crafted to send to my cousins. These incredible leaves were made with my Sizzix Big Shot Die Cutter, and the Concord and 9th Triple Step Autumn Leaf Dies.

Each leaf is a double layer - the bottom layer is a solid leaf and the top layer is a pattern. The bottom layer is cut from a leaf-shaped outline die and the top layer is cut from a patterned die that fits inside the leaf-shaped outline die. When glued together, the leaves become dimensional and are so colorful. The possibilities for color combinations are endless. This is a great way to use up your card stock scraps. I had fun looking through mine and creating the color combinations shown here.

Under The Plum Blossom Tree DIY: Autumn Blessings Handmade Greeting Cards, a blog post showing paper greeting cards made using a die cut machine and metal dies which are then glued onto a card base.

To make the cards, I first applied Recollections Sparkle embossing powder to a piece of Webster's Pages 'Begin Again' wood grain paper (I think it was produced around 2016) and to the white card stock circle embellishment (punched using a circle punch) using Honey Bee clear embossing ink and set them with my heat tool. (I bought my heat tool years ago but here are some options if you want one.)

I then created a card base by gluing a piece of brown card stock onto a Tonic Studio A6 card base and then glued the embossed Webster's Pages paper on top of the brown card stock. I glued each leaf pair together and then adhered onto the base, along with the white circle which I trimmed along the top. And lastly, I wanted to add a little more gold so I die cut more leaves from a piece of Lawn Fawn Metallic card stock (saved for another project) and glued some of the leaf and star-like cut outs into a few of the cut out portions of the leaves.

Under The Plum Blossom Tree DIY: Autumn Blessings Handmade Greeting Cards, a blog post showing paper greeting cards made using a die cut machine and metal dies which are then glued onto a card base.

I used black ink to stamp the 'Autumn Blessings' sentiment from the Spellbinders Fall Greetings stamp set and the three Paige Evans Garden Shoppe leaves (a Scrapbook.com exclusive freebie now gone) using my MISTI stamp tool.

Under The Plum Blossom Tree DIY: Autumn Blessings Handmade Greeting Cards, a blog post showing paper greeting cards made using a die cut machine and metal dies which are then glued onto a card base.

On the inside of the card I stamped the 'May the Season's Bounty fill your heart' sentiment from the same Spellbinders Fall Greetings stamp set, again using the MISTI stamp tool.

Under The Plum Blossom Tree DIY: Autumn Blessings Handmade Greeting Cards, a blog post showing paper greeting cards made using a die cut machine and metal dies which are then glued onto a card base.

And that's it! Which one is your favorite?

If you have any questions, let me know!

SHARE:

Thursday, September 29, 2022

Autumn Photo Shoot - A Scrapbook Layout

Under The Plum Blossom Tree, Autumn Photo Shoot - A Scrapbook Layout

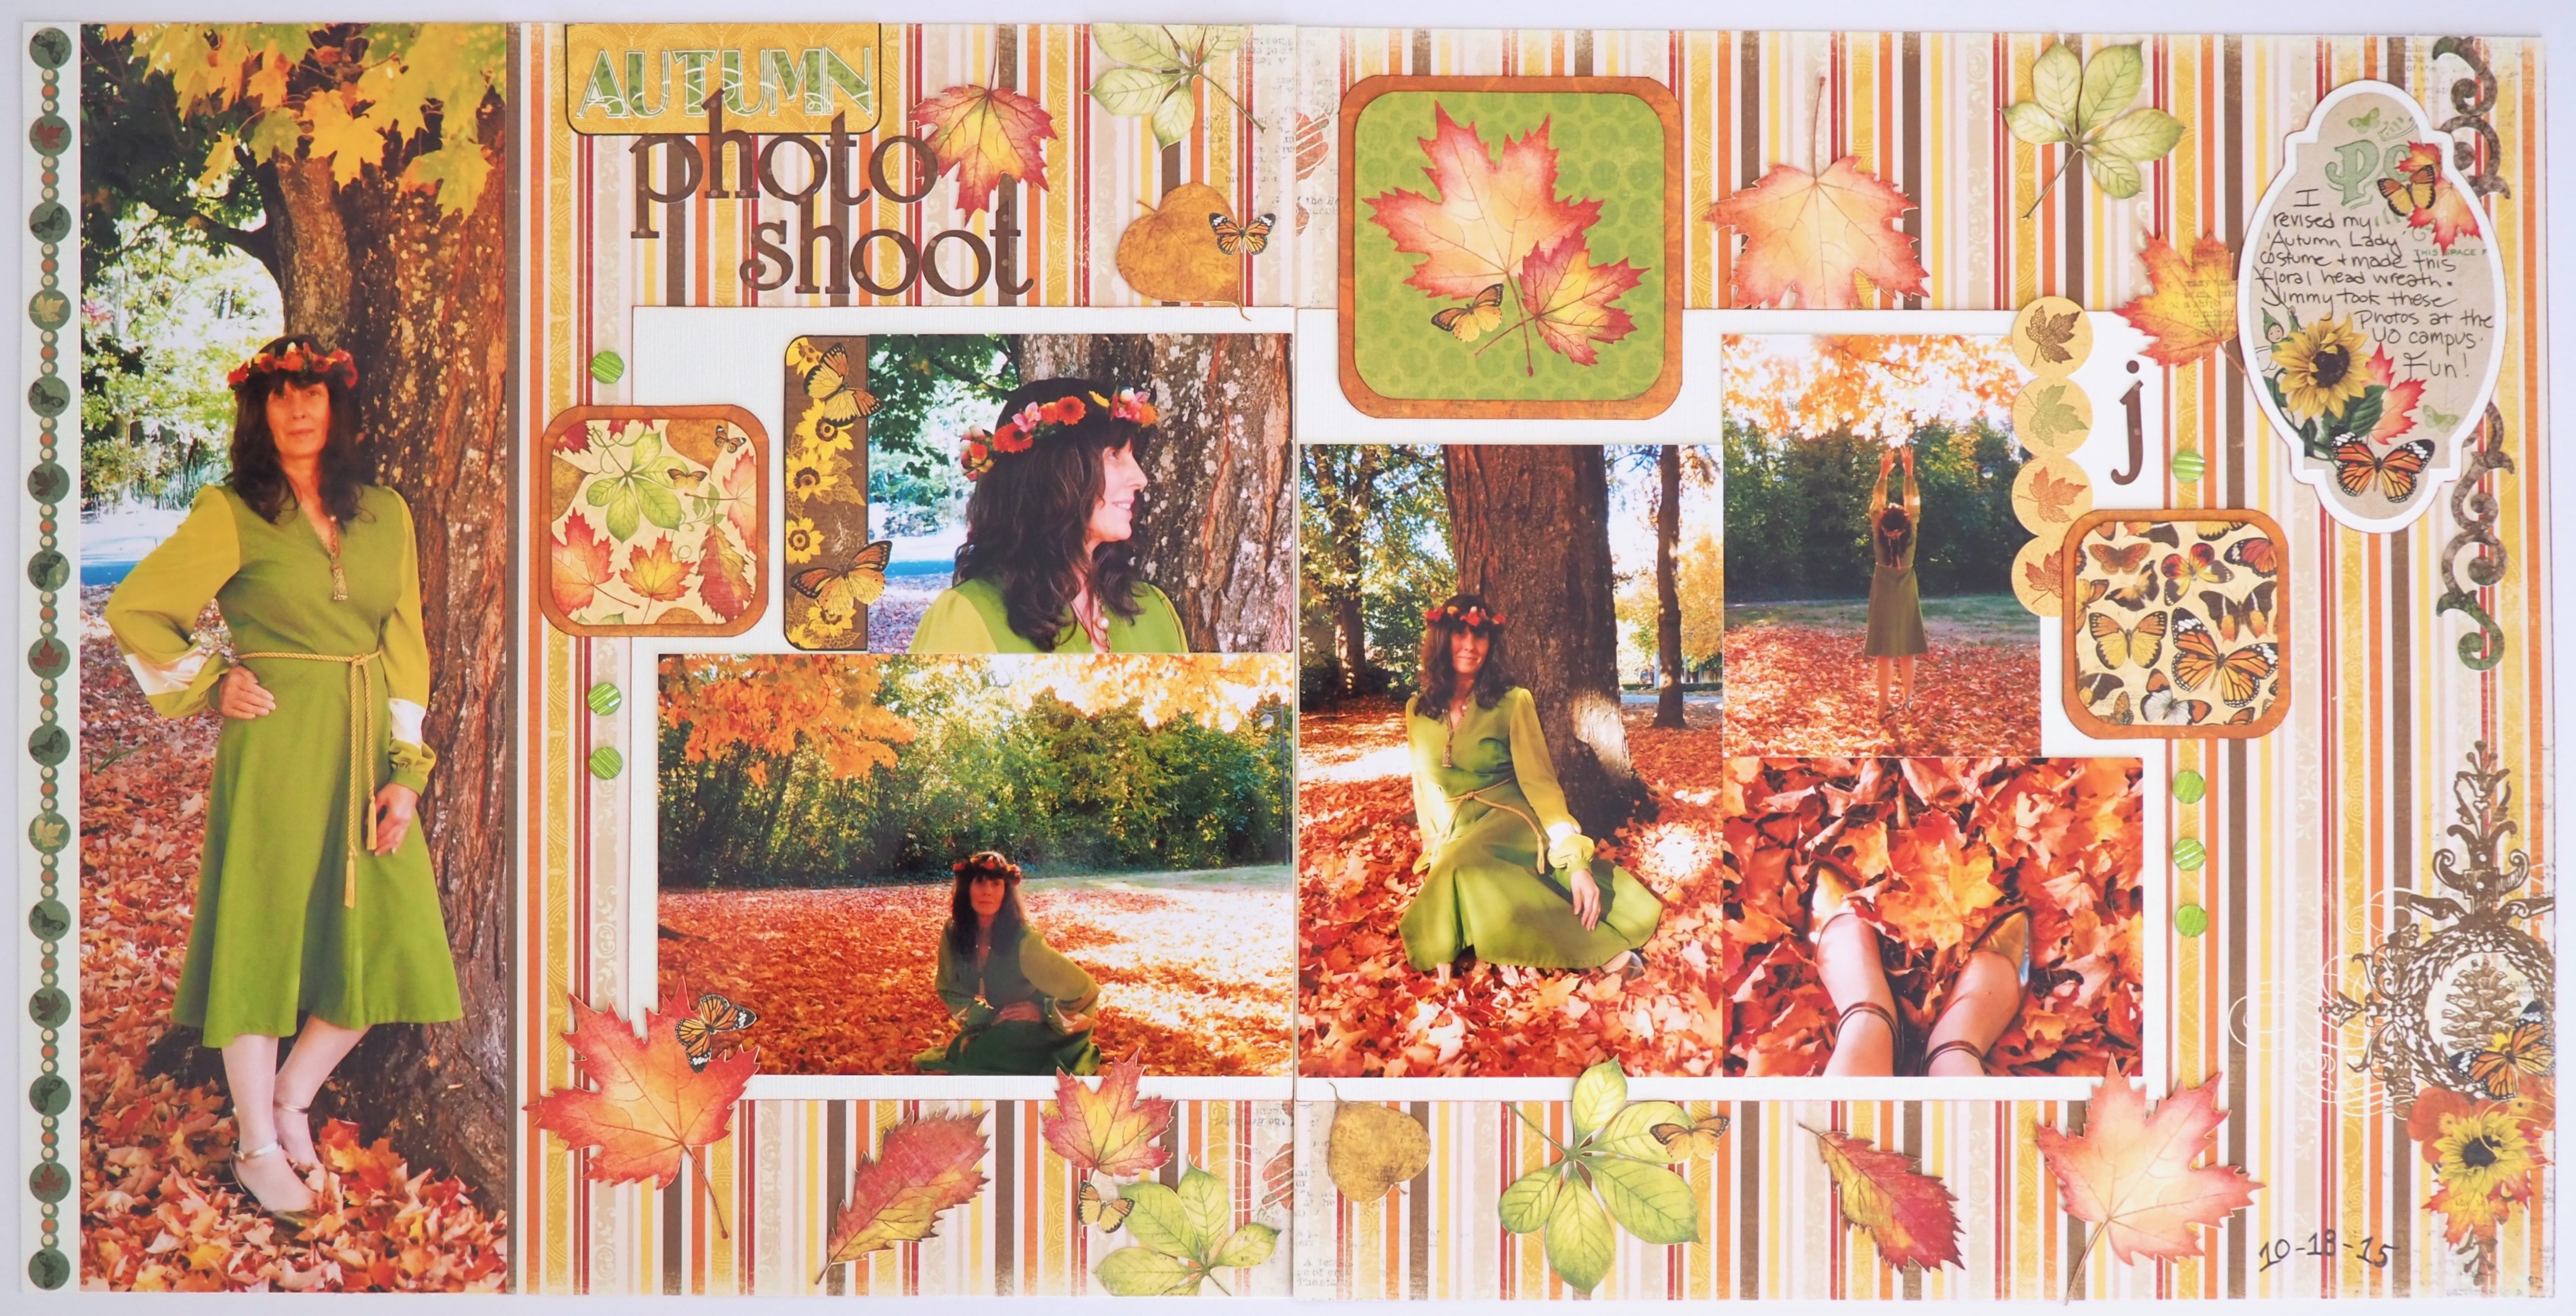
Hello friends, happy autumn! The wheels of 2022 are spinning fast, don't you agree? I was able to finish this autumn themed scrapbook layout a few months ago and it reminded me that it's never too late to finish a project that's been on your bucket list, even if the project has been on the list since 2015!

That was the year Jimmy took the photos of me featured in the layout. It was a 'just for fun' adventure, where we went around town taking pictures in a few different areas. The photos featured in this layout were the best ones from that day.

I purchased the supplies to make this layout back in 2015 and they have been sitting in a folder all these years. So never say never, right?

First, though, the photos. I have been getting my photographs printed at Persnickety Prints for several years now. The owner, Chari Pack, is a scrapbooker that understands the unique needs of those that enjoy this craft. For example, there are three sizes of photos on my layout - a 4x12, two 4x6's and three 2x3's. I enjoy using a variety of photo sizes, especially on a double page layout, and Chari offers many choices. The large 4x12 photograph is the feature photo and the rest of the pictures add interest and tell more of the story.

The paper crafting products I used for this project are from the Bo Bunny Enchanted Harvest line. Although they were discontinued long ago, I found a website that still has a few of the items available, and so you can see what the papers, stickers and embellishments look like in the link provided.

I started with two sheets of the Gratitude paper, then mounted my photos onto plain white card stock and adhered them down.

I then fussy cut several leaves from the Foliage paper and scattered them around the layout.

The three squares are cut from the Autumn and Traditions papers and mounted onto the 'B' side of the Foliage paper.

As well, I fussy cut the word 'Autumn' from the Traditions paper and used a small section from the Autumn paper to mount it on. The rest of the title letters ('photo shoot') are from the Combo Stickers sheet.

I fussy cut the sunflowers border next to my profile picture from the Autumn paper and then added more stickers to the layout from the Combo Stickers sheet.

I inked all of the card stock edges in brown. 

The green gems on the left and right sides of the photos are from Queen and Company.

And that's it! I crossed this task off my list and added the layout to my album.

What autumn inspired activity is on your to-do list?

SHARE:

Sunday, June 26, 2022

Hey There Tree Climber! A Scrapbook Layout

Under The Plum Blossom Tree, Hey There Tree Climber! scrapbook page by June Anderson

Hey There! I've always meant to share more scrapbook pages, but alas, as I look back at what I've posted here in the past, there isn't much! So today I'm publishing this layout about my son Tayo that I just finished.

Scrapbook pages are both a labor of love and (for me anyway) a labor intense activity. I spend a lot of time thinking about the stories that I want to tell and how I can best portray the character or characters and describe the event. I also spend a lot of time thinking about what the visual representation of the story looks and feels like. Traditional pages, like that above, are a fun and creative way to represent events, milestones or personality traits.

As well, the act of making a page is a vigorous mental activity that I enjoy getting lost in. Like collage, I enjoy solving design problems and spend quite a bit of time just sitting with everything in front of me and experimenting. A part of my brain gets very charged from this activity so I tend to want to stay there!

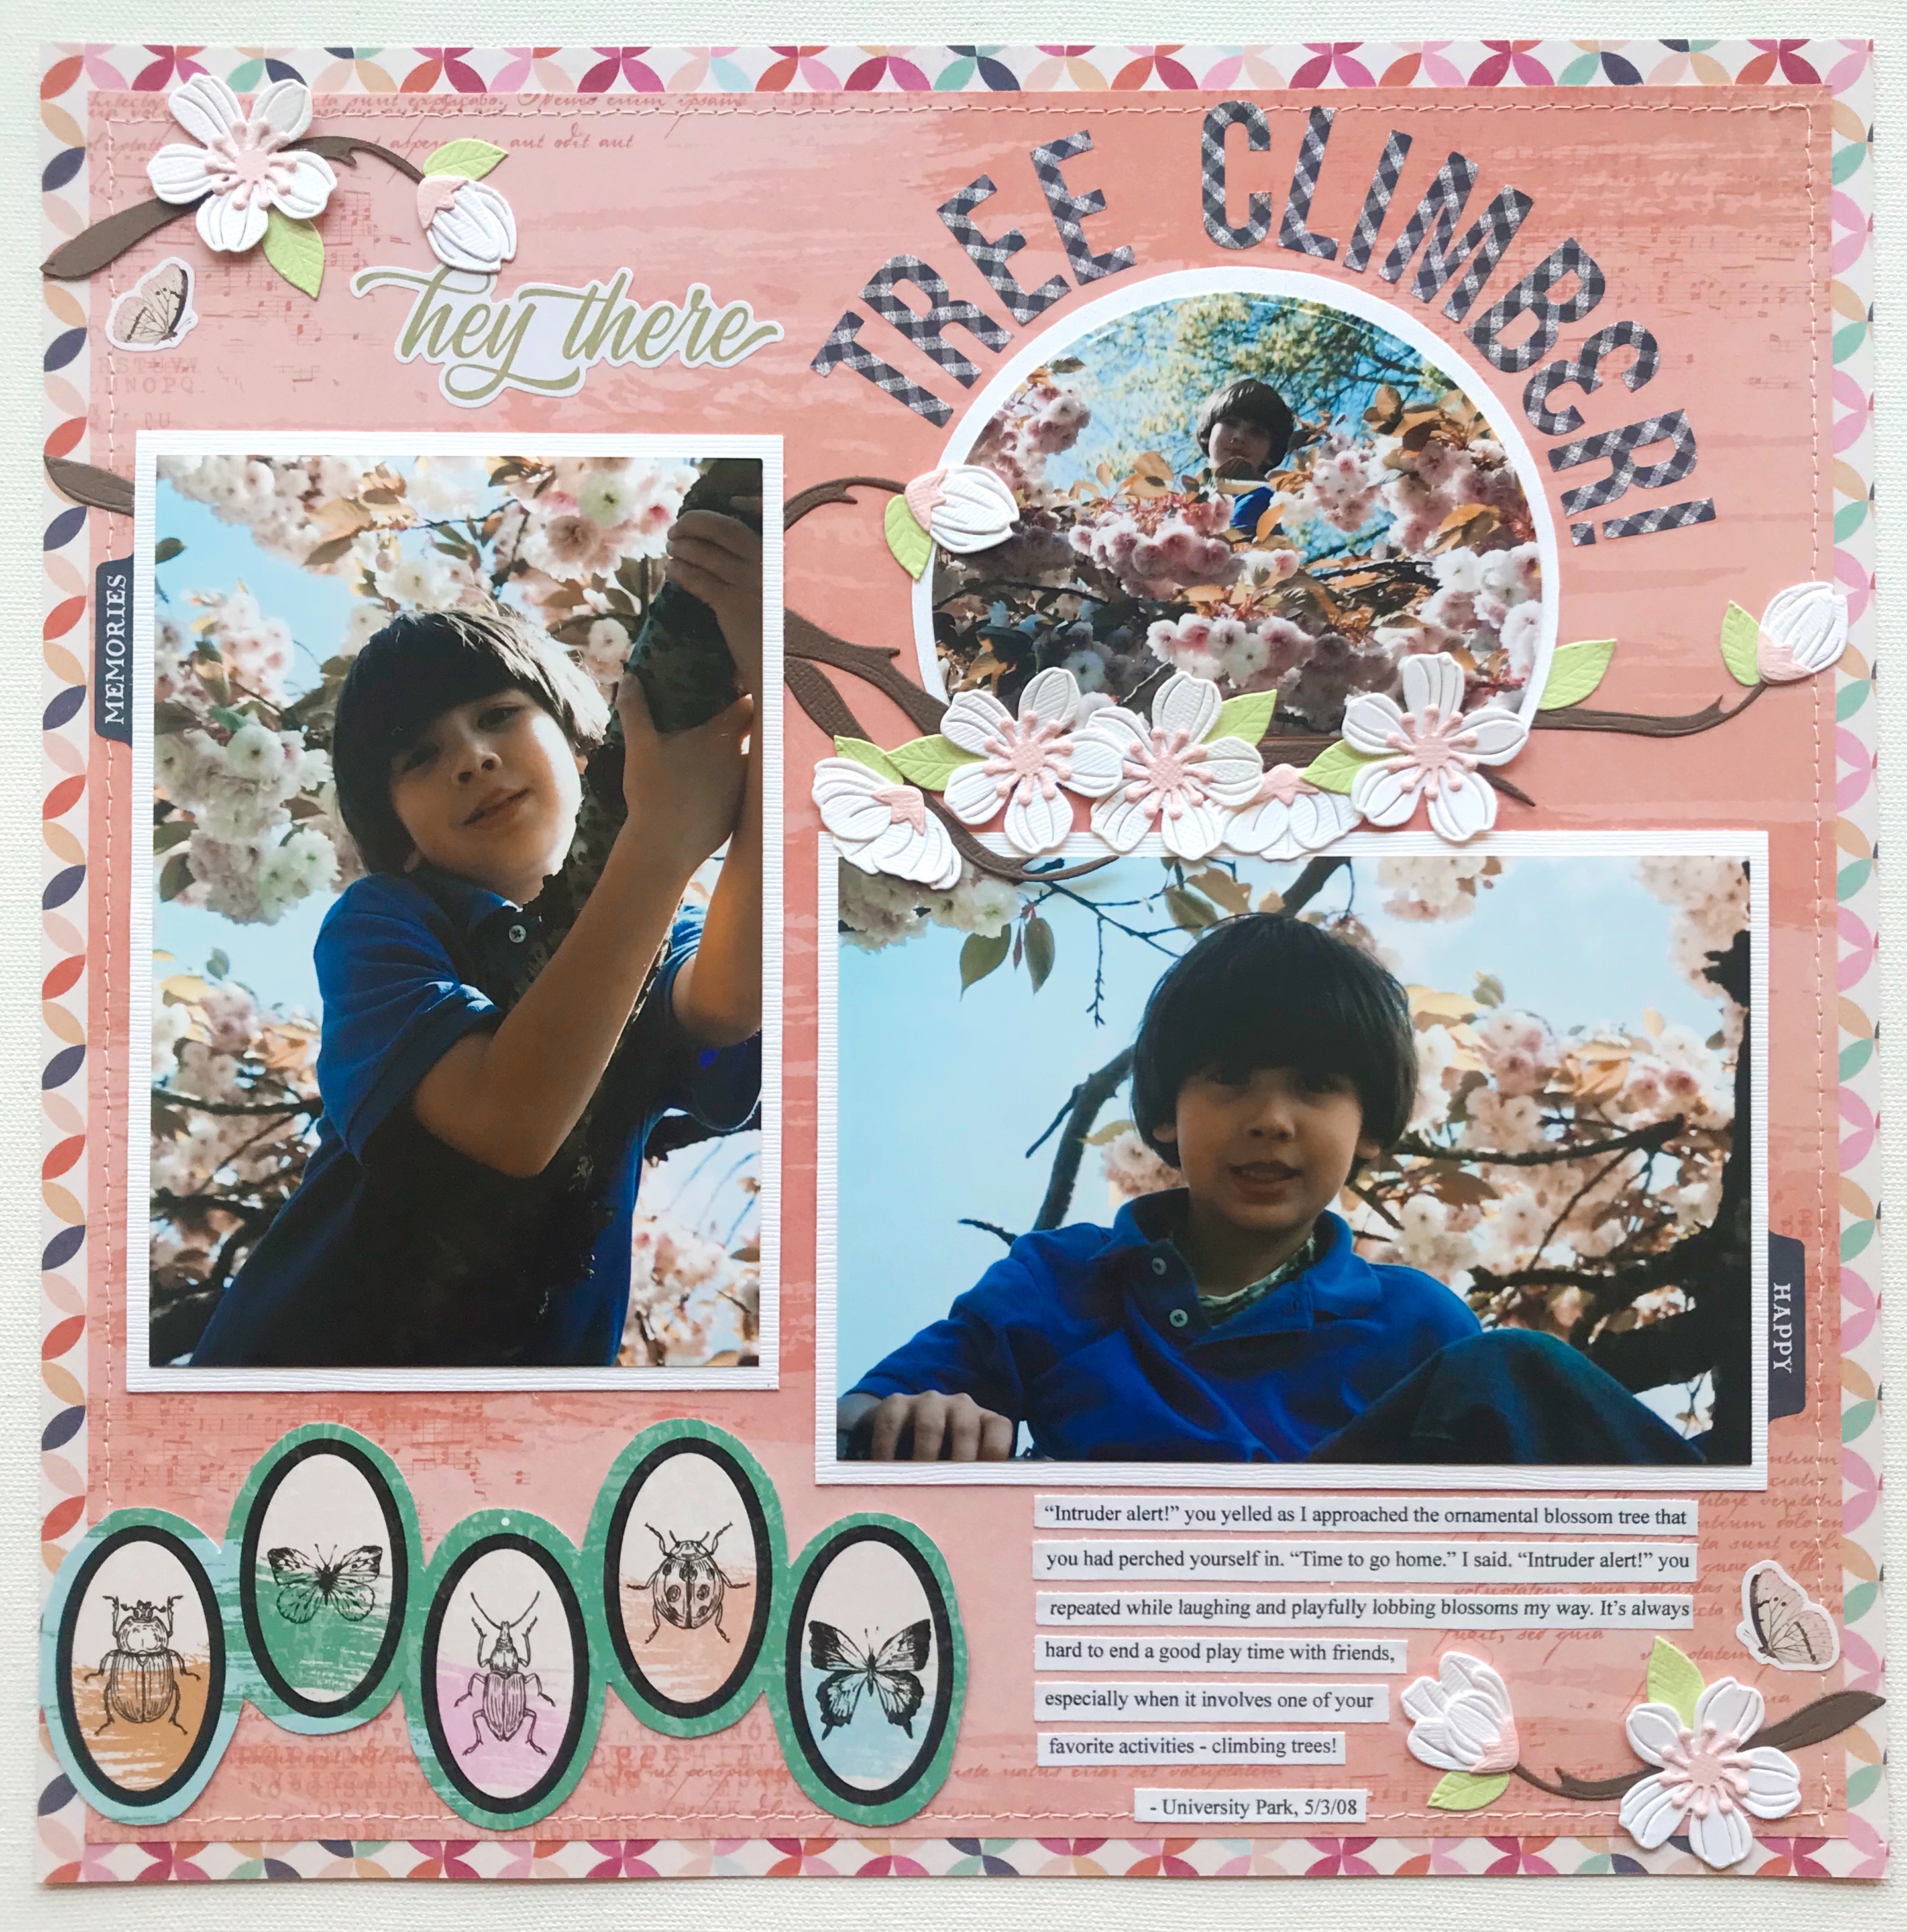
This page, titled Hey There Tree Climber! addresses both Tayo's love of tree climbing and showcases his sweet nature at age eight. There a quite a few photographs through the years of him climbing trees but I chose this particular set of photos because I was anxious to try out my new Spellbinders Layered Cherry Blossom cutting dies. Cherry or Plum Blossoms appear quite frequently around our house so I know I will get a lot of mileage out of this die set. In fact, I plan to make more scrapbook pages and some greeting cards as well.

For the base of my page I used two sheets of 12" x 12" Beautiful Things paper from BoBunny: Garden Party and Beauty. Before machine stitching the Beauty paper to the Garden Party paper I cut a section out of the middle of the Garden Party paper and set it aside for another project.

Each of the three photos are matted with Bazzill Avalanche cardstock.

The ornate florals are also cut from Avalanche cardstock and the remainder of the flower buds and branches are cut from leftover Bazzill bits and pieces. The details of the flowers are amazing! In fact once I had all the pieces cut I kept them in a vintage tray that was decorated with cherry blossoms and I got fooled more than once!

Under The Plum Blossom Tree, Hey There Tree Climber! scrapbook page by June Anderson

It took me a long time to maneuver the main branches and flowers into place while at the same time making sure there was room for the title and journaling.

The title, as well as the two moth stickers and the tabs on the sides of the photos are all from the Simple Stories Simple Vintage Indigo Garden Sticker Book. The journaling is printed onto copy paper. And finally, the insects at the bottom left of the page are cut from a sheet of 12" x 12" BoBunny Beautiful Things Collected paper.

And that's it! I'm happy how this page turned out and I hope you enjoyed seeing it.

Thanks for looking and bye for now!


SHARE:

Monday, May 23, 2022

DIY: Handmade Greeting Cards

Hello Friends! It's been so long since I've given my blog some love. Life since Covid has felt heavy and since my mom passed away last November my momentum to pick up the pieces has been slow...

I'm here today to share with you three greeting cards that I made recently using my new Sizzix manual die cut machine. It's so easy to get a perfect clean cut every time and the detail is amazing.

All of the papers shown here are from the new Bo Bunny Beautiful Things 6 x 8 paper pad. This size is perfect for card making because the images are scaled down and there is minimum waste. The bits of paper that are leftover can be used for die cutting the small die shapes which is fun if you are a 'mix and match' kind of crafter!

Each of the cards are made using a standard A6 size card blank from Tonic Studios.

As well, all three cards utilize the Sizzix Window Box stamps and die set by Olivia Rose, which I adore. 'Shaker box' type greeting cards are very popular right now and when I saw this particular set I knew I wanted to give it a try.

And finally, each of the three different sentiments are from the Elegant Sentiments stamps and die set from Waffle Flower Crafts.

For the background on the card to the left, above, I chose the Blooms paper (links are to the 12 x 12 sizes):

I stamped the scalloped circle using black pigment ink onto the B side of the Memorable paper and then die cut the shape. Both the stamp and die are part of the Sizzix Window Box set. I used one of the circle dies that came with my die cut machine to cut the background of the shaker box out of the Flutter paper. I also die cut a scalloped circle from a sheet of double sided foam adhesive from Scrapbook.com. And finally, I cut a circle shape (same size as the Flutter circle) from some leftover packaging material for the "window". Then it was a matter of layering these pieces together and adding the decorative sequins to create the shaker box. For this card I chose the Early Spring Premium Sequins from 28 Lilac Lane.

The next step was to stamp and die cut the floral bloom and die cut the six leafy embellishment pieces using the Sizzix Window Box set. The embellishment arrangements on all three cards are cut from the B side of the Blooms paper. This paper allowed me to create some very interesting variations in both color and gradations of color.

And lastly, I chose the 'Happy Birthday' sentiment from the aforementioned Elegant Sentiments stamps and die cut set, ink stamped it, and then die cut it from the B side of the Beauty paper.

The background of the middle card is made with the Fly Away paper:

Both the scalloped circle and the sentiment are stamped using black pigment ink and then die cut from the same B side of the Memorable paper as the previous card. The circle background inside the scalloped circle is plain white card stock. Again, I repeated the layering of the double sided foam adhesive, and a die cut circle from product packaging for the window. The floral bloom and leafy embellishments (from the Sizzix Window Box set) are also die cut from the same B side of the Blooms paper as the previous card.

For the shaker 'ingredients' I mixed Early Spring and Rose in Flight Premium Sequins from 28 Lilac Lane. For additional interest I glued two of the Rose in Flight butterflies to the background.

I chose the 'Thinking of You' sentiment from the previously mentioned Elegant Sentiments set.

The card on the right is made with the Dotted paper:

Again, I used the Waffle Flower Elegant Sentiments stamps and die set to stamp the 'Thank You' sentiment and die cut it and the scalloped circle (after ink stamping it as well) from the B side of the Beauty paper. The shaker box is layered with the double sided foam adhesive and some clear packaging, then filled with the same two sequin styles as the previous card. The Sizzix Window Box floral bloom and leafy embellishments are die cut, again, from the Blooms paper after having ink stamped the floral bloom.

And that's it! If you have any questions about the products used or my process, please reach out.

I had so much fun creating these cards. In fact, I made each card for a cousin and two of them will be posted today. I can't wait for the two cousins to receive their handmade cards. It's especially sentimental because I have not seen either of them since childhood and with my mother's passing we have come into contact and I want to keep in touch.

Speaking of keeping in touch, I have plans for a few more blog posts, so wish me luck!

And, as my mother would always say, bye for now... 

SHARE:

Thursday, February 22, 2018

One Little Word - February

Collage, Collage by June Anderson, One Little Word Collage by June Anderson, One Little Word Build, One Little Word, February One Little Word, OLW, Ali Edwards One Little Word,

Hey everyone! Welcome back to month two of my year long journey through the online One Little Word workshop, taught by designer, blogger, and teacher Ali Edwards.

The February creative prompt is to create a vision board that reflects your word. A vision board is, according to Ali, "a visual intention - a collection of images and words and phrases that speak to you for one reason or another in your life right now."

I am a collage artist and my word this year is BUILD. And if there is one thing I love, it is a collection of something! Over the years I have assembled a library of images that I've painstakingly cut from a variety of magazines. This 'library' consists of file folders labeled according to subject such as floral/fauna, letters/phrases, and home/garden. For instance, some of the images used in my vision board (above) are from Martha Stewart Living, House Beautiful, Smithsonian, The New Yorker, Better Homes and Gardens, National Geographic, Vogue, and some scrapbook and art publications that I don't remember the names of.

It was so much fun looking through my file folders while at the same time focusing on my word. It actually was a bit uncanny how many images I catalogued that reminded me of the word 'build'. In fact, at that beginning stage, I had chosen enough images to fill a board twice the size of the finished work and was seriously thinking of going out and buying a larger canvas. But eventually I talked myself out of the idea realizing it was crazy to make a huge collage simply because I was having a hard time whittling down my choices.

The piece, 18"x24", consists of both literal depictions and symbolic imagery.

The literal depictions are easy to spot: Gehry tower in the lower left corner; the scissors, camera, typewriter and paintbrushes are my go-to 'tools of the trade'; the watering can, bird house, roses, and Japanese-style garden lantern indicate essentials in the garden; the 'blue onion' patterned dinnerware plate calls to mind my newest interest in collecting vintage and antique dish ware; the tiny blue tassel reflects my obsession with the ever popular chinoiserie style of home decor; the textiles, wallpaper samples and hanging pendant bird lamp help to remind me of the home improvement and decorating projects I want to make happen.

Some of the symbolic imagery can be quite obvious as well: the plum blossoms stand for this Under The Plum Blossom Tree blog and the cup of tea stands for my Etsy shop Vintage Tea Treasures. As well, the image of women and books is characteristic of my feelings for all the awe-inspiring creative women I've met on Instagram, in particular through #collectandstyle, a hash tag project I started; the watch and the clock - obvious reminders of time passing, time running out and making the most of the time that I have.

You may have noticed the minimal use of words and phrases on my vision board. The truth is I am an introvert. I prefer quiet, solitude and contemplation over crowds, noise and nonthinking. Even the aforementioned file folder marked 'words/phrases' is quite scant compared to the other folders, but I was pleased with what I did find: 'fun' because that's the way it should be; 'on a roll' to keep my spirit up; 'presence of mind' to keep me focused; 'power' to help me be strong; 'Pleasure, purpose, pride - the three strands of happiness' because, like in mathematics, there's an order of operations, right?

My favorite images are the free-form style white buildings with birds and flowers encircling them (upper left corner) and the whimsical people-like creatures riding unicycles (lower right corner). These represent a subjective symbolism for me because of their made up structure. They remind me that life is constantly full of new opportunities and new ways of seeing the world. They allow me to re-imagine a new way of living. And that is the kind of thinking that gives me hope, helps me to keep going in my endeavors, and enables me the willingness and the courage needed to look towards an unknown future.

Also, too, the fact that several of the images I've assembled on my vision board are collections of objects is a strong reminder that it takes practice, time and a caring attitude to build anything significant in life. I'm reminded of the many other words used to describe 'build', such as construct, oversee, incorporate, compile, establish, and develop.

I'm sure it's easy to conclude that my love of Mother Nature is evident. But on a deeper level my fascination with, and respect for, the natural world is steeped in the wonders of the essential 'building blocks' of nature; isn't it amazing how unseen particles and matter, coupled with the abstract concepts of time and space, unite and produce the physical elements that create beautiful life forms like the wing of a dragonfly, the feather of a bird or the perfect shape of an egg? The infinitesimal array of shapes, patterns, and colors delight the eye, command our awe and can inspire us to contemplate our very existence.

June Anderson, June Anderson and collage, original collage artwork by June Anderson, One Little Word February creative prompt, One Little Word BUILD, One Little Word creative project, One Little Word February prompt

My favorite part of Ali's words in her description of the project was that "it's a way to connect your head, your heart and your hands". I'm always in for a good art project, especially one with rich meaning, so I couldn't agree more!

Thank you Ali Edwards, and thank you dear reader! If you feel inspired to make your own vision board, I'm happy to answer any questions you may have. You can leave me a comment here or send me an email.

And if you like this series, please visit me next month for the March One Little Word creative prompt. If you would like to be informed when I publish the post you can sign up for an email notification at the top of this blog - look for 'subscribe' under my profile photo, enter your email address, and Blogger will send you an email. 
SHARE:

Tuesday, January 30, 2018

One Little Word - January

One Little Word, One Little Word January, January One Little Word, Ali Edwards One Little Word, Ali Edwards One Little Word class, One Little Word 2018, One Little Word January 2018, #OLW, #onelittleword, One Little Word The Beauty of Becoming, One Little Word Show Up, One Little Word Do the Work, One Little Word Build

Hi friends! How is your new year going so far?

In a blog post earlier this month I mentioned that I was signing up for One Little Word, a year long online workshop, taught by designer, blogger and teacher Ali Edwards.

I have known about One Little Word for a long time and always thought I would like to try it, and finally, I am! And I'm excited to share this journey with you.

The purpose of the class is to invite one word into your life that will act as a year long guide and an investigative tool. It allows you to concentrate on different aspects of daily experience and apply your word to real life situations. Each month there will be a new creative prompt to help bring your chosen word into focus.

For 2018 my word is BUILD. The reason I chose build is because it feels as if there is still so much more in life to accomplish. I am blessed in that I have a solid foundation on which I have already built my life - a comfortable home, a healthy and happy family, and employment. I now wish to utilize that foundation to grow independently and thrive in ways different than what I am accustomed to. I want to challenge myself to experiment with new ways of thinking and doing.

Build feels action oriented, creative, and encourages me to be self-initiating. Build has plasticity, allowing me to decide what form it will take in my life and give me the freedom I need to shape events. Build will help me to develop ideas into actionable steps and to learn how to expand and refine those ideas. With build I can incorporate my own unique style. And lastly, build has a cumulative effect - starting now I am giving myself the permission and the opportunity to engage with life in new and unexpected ways in order to expand on that which I have already established.

And it's going to be hard! Having now answered all the prompts for January, I am now rubbing up against the challenge of diving deeper into these questions: What do I want less of in my life? What do I want to let go of? What do I want more of? What do I want to invite into my life? I don't know if you are like me, but faced with having to sit down and think critically and objectively about such questions and the act of having to write something down on a blank card is a bit intimidating.

But necessary!

Another prompt for the class is to find a quote containing your word that resonates with you. I will close with this one I found by His Holiness the Dalai Lama:

With the realization of one's own potential
 and self confidence in one's ability, 
one can build a better world.

Thanks for reading!


SHARE:

Saturday, May 9, 2015

A Mother's Day Greeting Card And Name Banner

Mother's Day, Mother's Day Greeting Card, Name Banner, scrapbook supplies, use scrapbook supplies to make card, use scrapbook supplies to make banner


Since tomorrow is Mother's Day here in the U.S. I would like to show you a greeting card and name banner that I made for my mom.  Last Saturday was National Scrapbook Day, and I wrote here on the blog about my recent memory keeping projects, and referenced some of the products I've been working with lately.  Today, I'd like to show you how I used more of the Studio Calico Project Life kit 'Lisse Street', along with some of the patterned paper that I ordered as an add on.  I also worked with a few of the items from the Park Ave scrapbook kit, and added a sheet of Bazzill yellow-gold cardstock to the mix. 

Mother's Day, Mother's Day Greeting Card, Name Banner, scrapbook supplies, Studio Calico, Studio Calico Lisse Street, Studio Calico Park Ave

The finished size of the card (below) is 5x5 inches.  After cutting the yellow-gold cardstock to 5 inches wide and 10 inches long, I used a scoring blade in a paper cutter to score it in the middle of the length to create the base of the card.  Then, I cut a piece of white cardstock just a bit smaller for the front, and another for the inside, then embellished the front with transparencies, letter stickers and chipboard.  

Mother's Day, Mother's Day Greeting Card, Name Banner, scrapbook supplies, use scrapbook supplies to make greeting card, handmade greeting card
For the banner, I cut one 3"x4" rectangle for each letter from the striped paper, then cut the flower patterned paper just a bit smaller so that it would fit inside the striped paper, notching them at the bottom to give them that 'banner' look. Then I punched holes in the corner of each one and strung them using baker's twine.

Mother's Day, Name Banner, gift idea, handmade banner, use scrapbook supplies to make banner

name banner, scrapbook supplies, use scrapbook supplies to make name banner

My mother now lives in a nursing home very close to us, and I'll be bringing these gifts to her tomorrow.  I made the banner to hang on the door of her room; several of the other residents have cute things on their doors and I thought it would be nice for my mom to have something that would add to the cheeriness in the hallway, and maybe lift her spirits, as well.

Mother's Day Greeting Card, Mother's Day gift idea, scrapbook supplies, use scrapbook supplies to make greeting card, use scrapbook supplies to make banner

I've written a little bit about my mom in the past - she not only has Alzheimer's but has also struggled with illness and a serious injury in the past few months.  Things are looking up lately, and she's doing much better, although being 91 (almost 92!) is hard enough as it is.  In the quiet hours of the morning, I'm going to write a sentiment inside the card, before going to visit my mom tomorrow.  Happy Mother's Day!
SHARE:

Saturday, May 2, 2015

National Scrapbbook Day

Sn@p albums, pocket scrapbooking, scrapbooking, banner, Crate Paper banner, Maggie Holmes banner
    National Scrapbook Day is the perfect opportunity for me to show you what I've  been working on lately.  About two years ago, I started Project Life - the system of memory keeping that utilizes pocket-style page protectors that hold photos, memorabilia and a variety of what are called journaling cards.  The stack of albums in the photo above shows the result of the past two years.  This (for me anyway) is a 'can do' method - more than anything, my photos are housed in albums chronologically and are easily accessible.  I've picked only the pictures that best represent what is happening in our family, and used scrapbooking products that are geared for this type of memory keeping.  

If you would like to see a sample of some of the layouts I've created for this type of album, you might like to read my post Pocket Scrapbooking.  So, if you are looking for a way to get photos into albums and make it look good, this is it! Don't get me wrong though - I still love making traditional scrapbook pages!

Studio Calico scrapbook layout, we are so good together, june and james, Studio Calico, patterned paper, chipboard, wood veneer, washi tape, journaling card, tag

I am a member of Studio Calico's Project Life kit club, and each month I receive a set of journaling cards in 4x6 and 3x4 sizes and a variety of embellishments which vary from month to month.  Recently they offered some of their Scrapbook Club kits for $10.00, so I ordered one to try it out.  I made the above layout using some of the products from that kit, and mixed in some of my Project Life kit products.  This layout is a celebration of how James and I, in working side by side on our separate projects, support each other's endeavours.  (You might be wondering why the lower right corner looks as it does - it's a result of the paper curling from having used gesso on the background.)

Studio Calico, Yes, Please I'll Take the Weekend!, journaling cards, faffing, photography, doily, Sun, Mon, Tues, Wed, Thu, Fri, Sat, Sun, heart stamp, this

I recently challenged myself to make a traditional scrapbook page using only the leftover products in my November Project Life kit.  The photo in the layout is one I took for my Instagram feed, and this page is a way of documenting my love of still life photography.  

Thanks for taking the time to read this post, and if you enjoy scrapbooking, or if you have any questions, please leave me a comment.  And if you would like to know more about Studio Calico, click here.    
SHARE:

Friday, September 26, 2014

Welcome To My Autumn Garden

scrapbook layout,
    Seasonal changes are alive here in the Willamette Valley of Oregon.  As Mother Nature shifts from late summer to early fall, I am reminded of how much joy my garden gave me last year at this time.  Recently, I made this layout to commemorate the small pleasures of my garden in Autumn: changing colors, birds that flit in and out of my yard, and the beginning of the rainy season.  What seasonal changes are you welcoming right now?  
SHARE:

Monday, September 1, 2014

Pocket Scrapbooking

6x8 pocket scrapbook, studio calico sandlot kit, Take a Deep Breath in my Garden, 4x6 photo, 6x8 photo, 3x4 Project Life cards, Project Life
    I've been scrapbooking for about ten years now, but I've really been a memory keeper for as long as I can remember.  I've always enjoyed collecting things;  from a cigar box with a few treasures in it during my childhood, to cards, letters, and memorabilia from my teen years on.  It was also while I was a teenager that I became interested in photography, and I've been taking photos ever since.  It only seemed natural then, that I would gravitate towards scrapbooking.  

I enjoy making traditional layouts, which for me, has been the 12x12 inch size, but in my search for a way to more fully document our family's day to day lives and still have a creative way to express those lives, I've started to utilize the 6x8 inch pocket albums.  The beauty of this format, besides its ease and how quickly pages come together, is its versatility.  I can work on any pages I want, in any order I want, and because it's a ringed binder, I can add things, move pages around, move individual photos or cards around - and it all remains a seamless story.

Here are three page spreads from my current album.  I've recently joined Studio Calico's Project Life monthly kit club.  It comes with a selection of both 4x6 and 3x4 cards, and several embellishments such as labels and alphabet stickers.  The garden layout above was made using my first kit, which is called Sandlot. 

I love to showcase my garden, and you may recognize the enlarged photo on the right from last weeks post about my lilies.  I knew that lily would be one I would also like to emphasize in my album, and chose it for this spread.  Once I had my photos chosen and printed, it was as easy as slipping the 4x6 photo into that bottom left pocket, and mounting the enlargement onto card stock.  Then, I chose those two 3x4 cards for the top left pockets, did a bit of embellishing, and I was done. 

6x8 pocket scrapbook, studio calico sandlot kit, World's Greatest Kids, 4x6 photos, 3x4 Project Life cards
This second spread is my way of thanking my kids for indulging me in a photo shoot on Mother's Day and was also made using the Sandlot kit.  This is a similar layout to the first one above, but this time I've used three 4x6 photos.  Another couple of 3x4 cards embellished with letter stickers, wood veneer and some ink stamping slipped into the top left pockets finished off this page.  

6x8 pocket scrapbook, wedding, Kaede's Wedding Day, instagram photos, 4x6 photo, spring wedding, Project Life

This layout of my step-daughter Kaede's wedding is actually in three parts, of which I've finished only this introductory page. For this spread, I utilized some leftover papers I had from having made a 12x12 layout for my family album.  The floral paper on the left was cut from a 12x12 sheet of patterned paper, then mounted onto white cardstock.  The 4x6 photo was also mounted onto white cardstock.  On the right side I mounted a 3x4 card (not from the Studio Calico kit) on top of paper I cut to 4x6, then fussy cut a couple of flowers from more leftovers.  A few brads are securing those sequin flowers on the left.  Since Kaede's wedding was such a big event, I found that the 2x2 Instagram photos worked very well to fill in all the details of this beautiful story.

I hope you've enjoyed viewing these pages; I've enjoyed sharing them!
SHARE:

Saturday, May 10, 2014

On Motherhood

Hello Sweet Babies scrapbook page by June Anderson, On Motherhood essay by June Anderson, baby scrapbook page by June Anderson, Emily Anderson baby photo, Takeo Anderson baby photo
Hello Sweet Babies
"Don't stand unmoving outside the door of a crying baby whose only desire is to touch you. Go to your baby, go to your baby a million times."  - Peggy O'Mara

The roots of my mothering began in the mountains of Colorado over twenty years ago. It was then that I discovered Peggy O'Mara and her magazine, Mothering. The challenges before me, about how to birth and raise babies, were presented there; each editorial, each article, gave insight into and argued for natural childbirth, breastfeeding, the family bed, and attachment parenting.

The editorial page, A Quiet Place, focused on current information, much of it scientific and cross-cultural, and gave me good reasons to choose to parent in this way. I will never look back with regret at those choices. They stand the test of time; they are grounded in love, compassion and a desire for a harmonious family relationship. I miss the early days of our family, and so, on this Mother's Day, I created the scrapbook layout above to commemorate days gone by...


My babies are grown now, one a young adult and the other a teen. The challenges of parenting are as ever-present as those first days, of course, but what has changed is that I have learned to rely on my own inner voice, the voice that Peggy O'Mara assured me was there from the very beginning. Sure, sometimes I stumble, or even fall, but the bedrock of my parenting style was laid long ago and I have a solid foundation on which to land. And with these two by my side, I know that we can weather whatever challenges we may face as a family.
SHARE:
© Under The Plum Blossom Tree | All rights reserved.
Blogger Template Created by pipdig